How to Take Good Fit Pics
Wed Apr 22 2026
This is a guide I’m writing to hopefully democratize photography a bit for either day to day fit pic taking, or especially special events like fit battles or duels or maybe theme challenges. It doesn’t take that much intention or knowledge to really level things up, and it doesn’t take anything more than a phone to take some really good photos. I’m hoping this can outline some of the processes to achieve this and encourage people to step outside their comfort zone a bit and coordinate their photography with intention to create some really special pictures.
Table of Contents
- Stuff that’s really important for fit pics but has nothing to do with a camera
- I just have this dumbass phone how do I make it take good photos
- Help I have this digital camera I bought when it was a TikTok trend and there’s 7 knobs and idk what any of them do
- Conclusion
Stuff that’s really important for fit pics but has nothing to do with a camera
Location
A good backdrop can exponentially elevate a fit pic. Choosing one that fits the pic is an art itself, but most people have a lot more material than they might think to work with. Take a look at the neighborhood around you, there’s probably some beautiful walls or corners or parks that have faded into the background of normalcy. Take a walk through those parks or take a trip out to a nearby state park with some scenic views or beautiful natural features and see if anything sparks some inspiration. Look up the museums in your area, many will have published rules on camera use and most will allow hobbyist photography for free (occasionally with some limitations). For all the photos I’ve taken for all the fit battles I’ve participated in:
- 2 were in just one of my city’s art museums
- 3 were taken across 2 parks within 10 minute drives from my house
- 2 were around my neighborhood within a 10 minute walking distance
You will almost certainly have to cope with at least one other person seeing you taking these photos if you want to take good ones. As someone who was once deathly afraid of this, it’s so much less of a deal that you think it will be. You can usually pretty easily pick a spot that’s not in the middle of high traffic areas, and then as people walk by you either smile at them or you pull out your phone and turn the other way as if waiting for someone who is in fact not coming. It’s worth it to get over this social anxiety because most people will not care, some people will think it’s cool, and it will have such an insanely positive effect on the final product that it’s worth pursuing.
Lighting
Considering the lighting you’d like for your shot can help you schedule things out and will also influence the vibe of the pics you’re going for. Do you want harsh, direct light, to create a lot of dynamic shadows in the folds of your clothes? Or more even light filtered through some clouds to light you up but in an even, neutral way. Or do you want to shoot for golden hour with a sunset sky, or shoot for something in a well lit interior. Either way, having a good light source is important for taking a high quality photo regardless of the camera involved. All cameras take better photos with more light.
Everyone edit your photos NOW
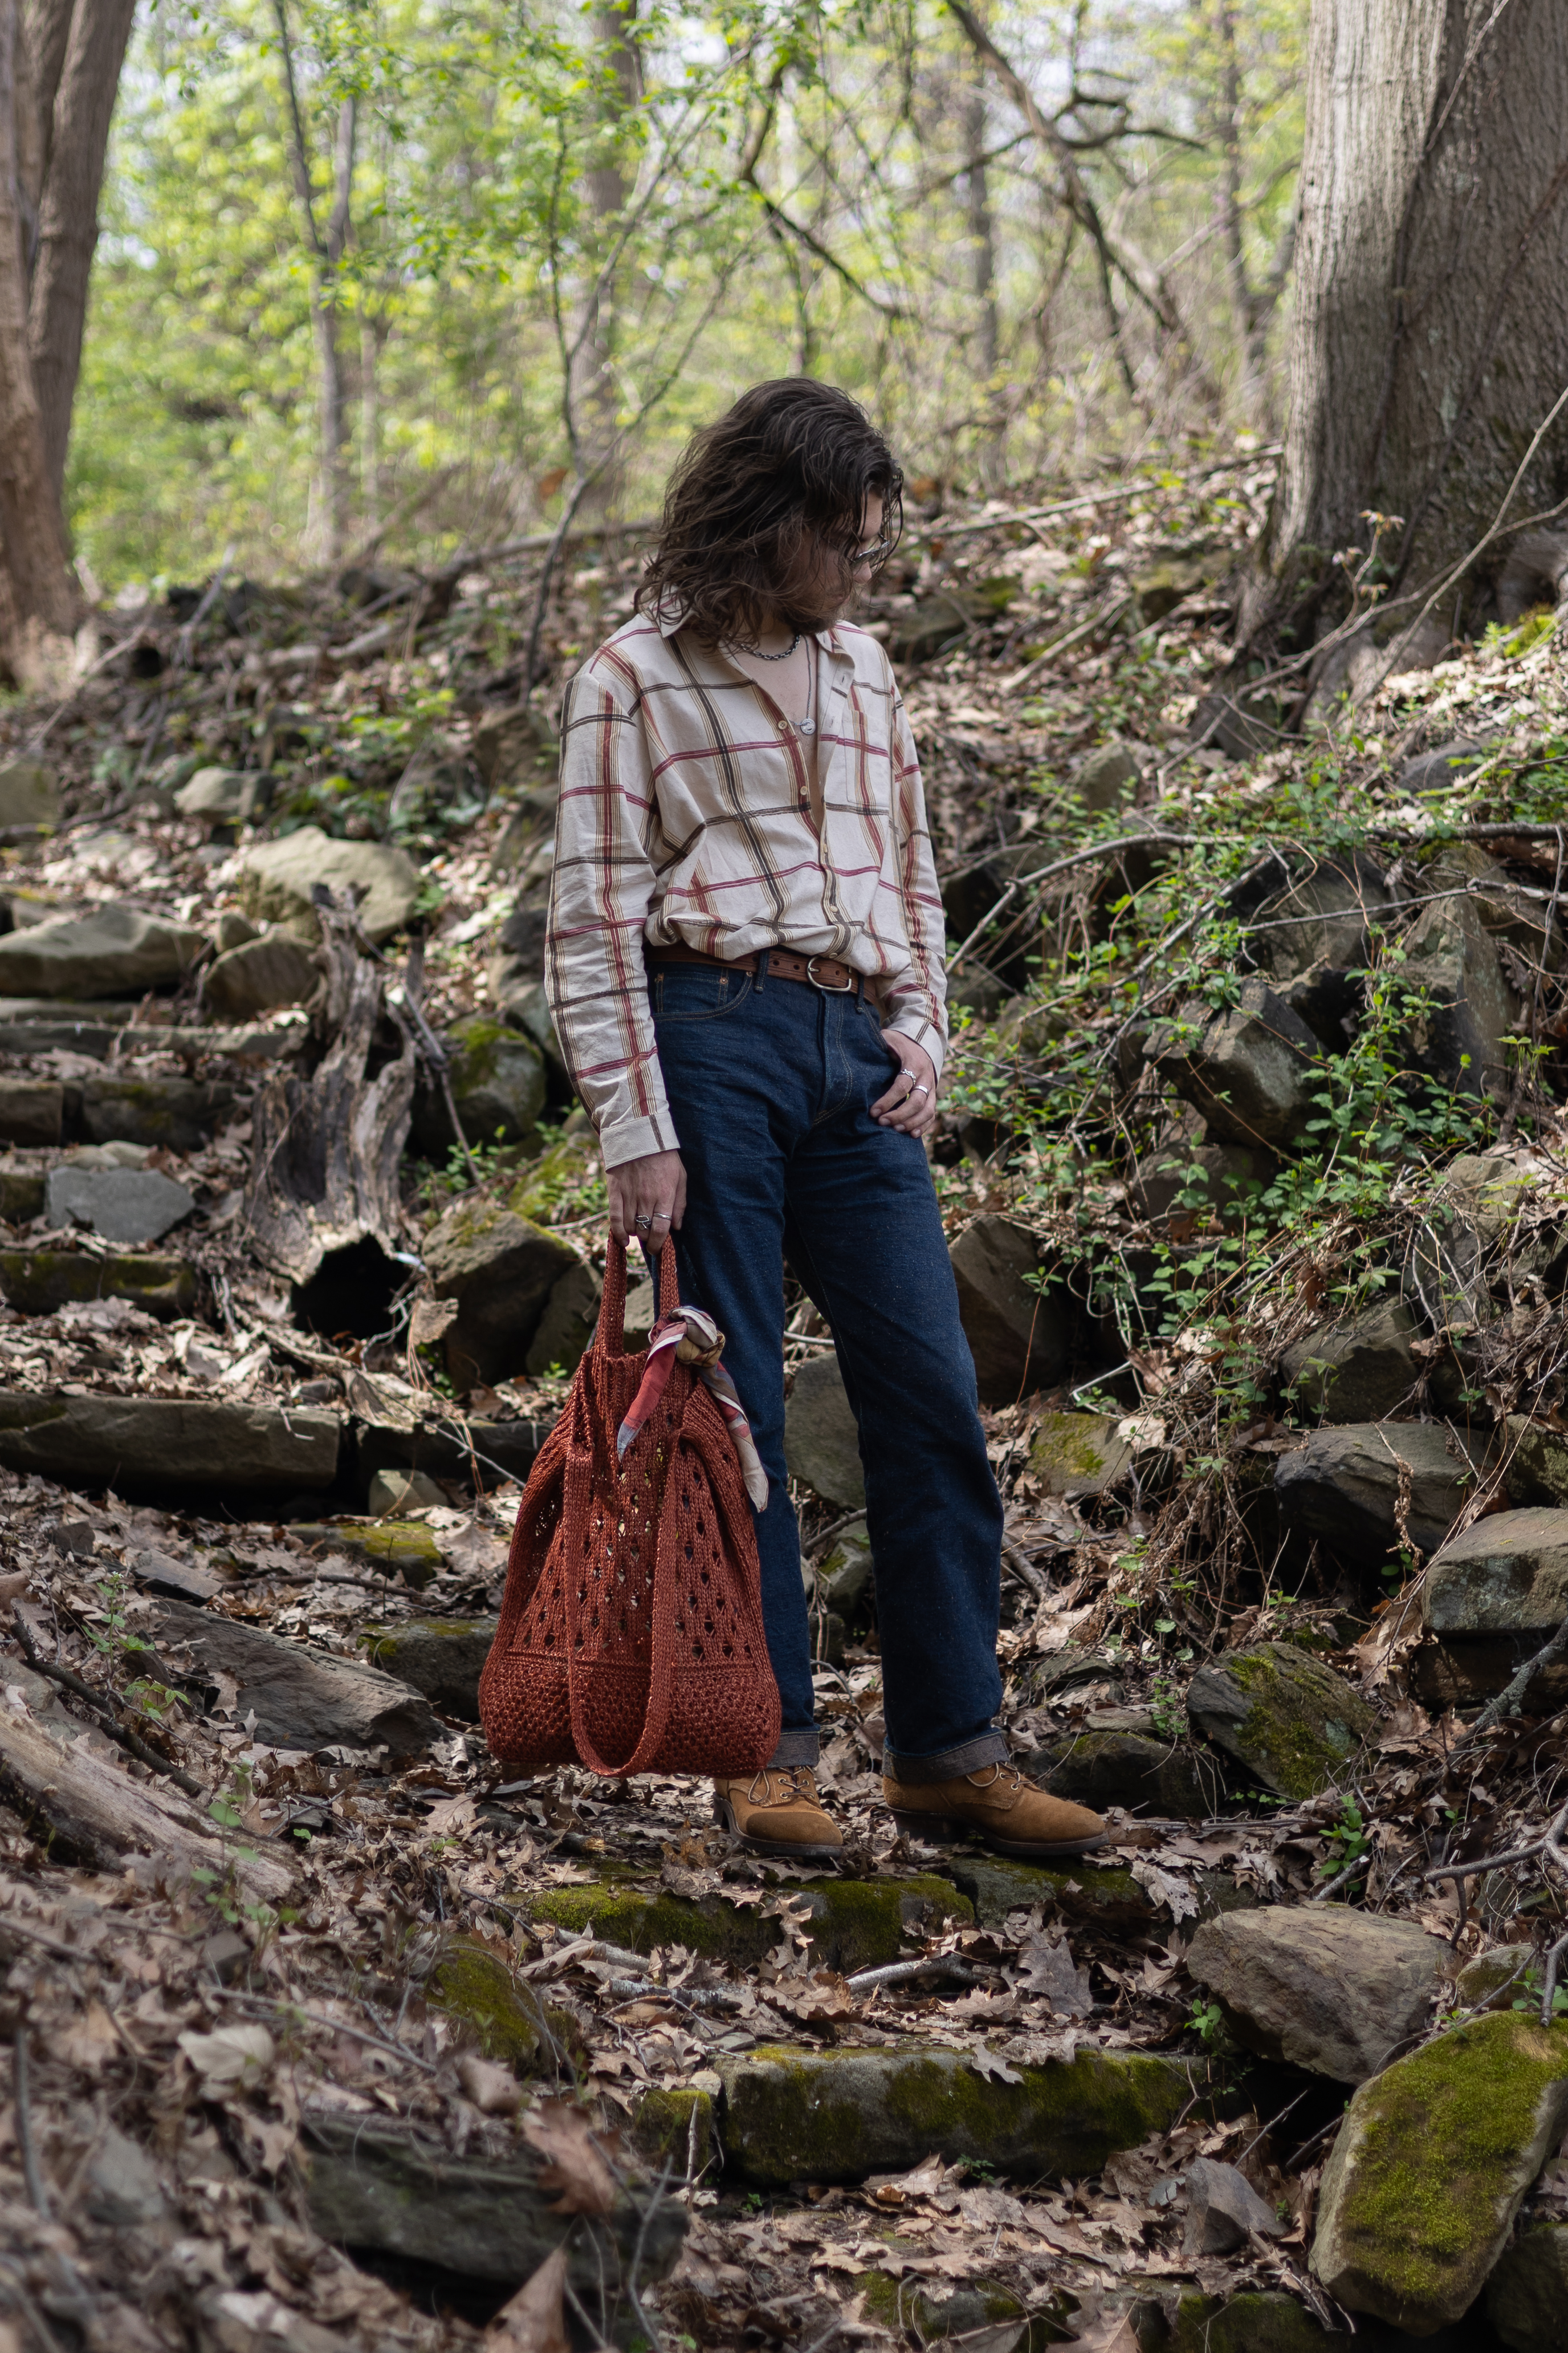
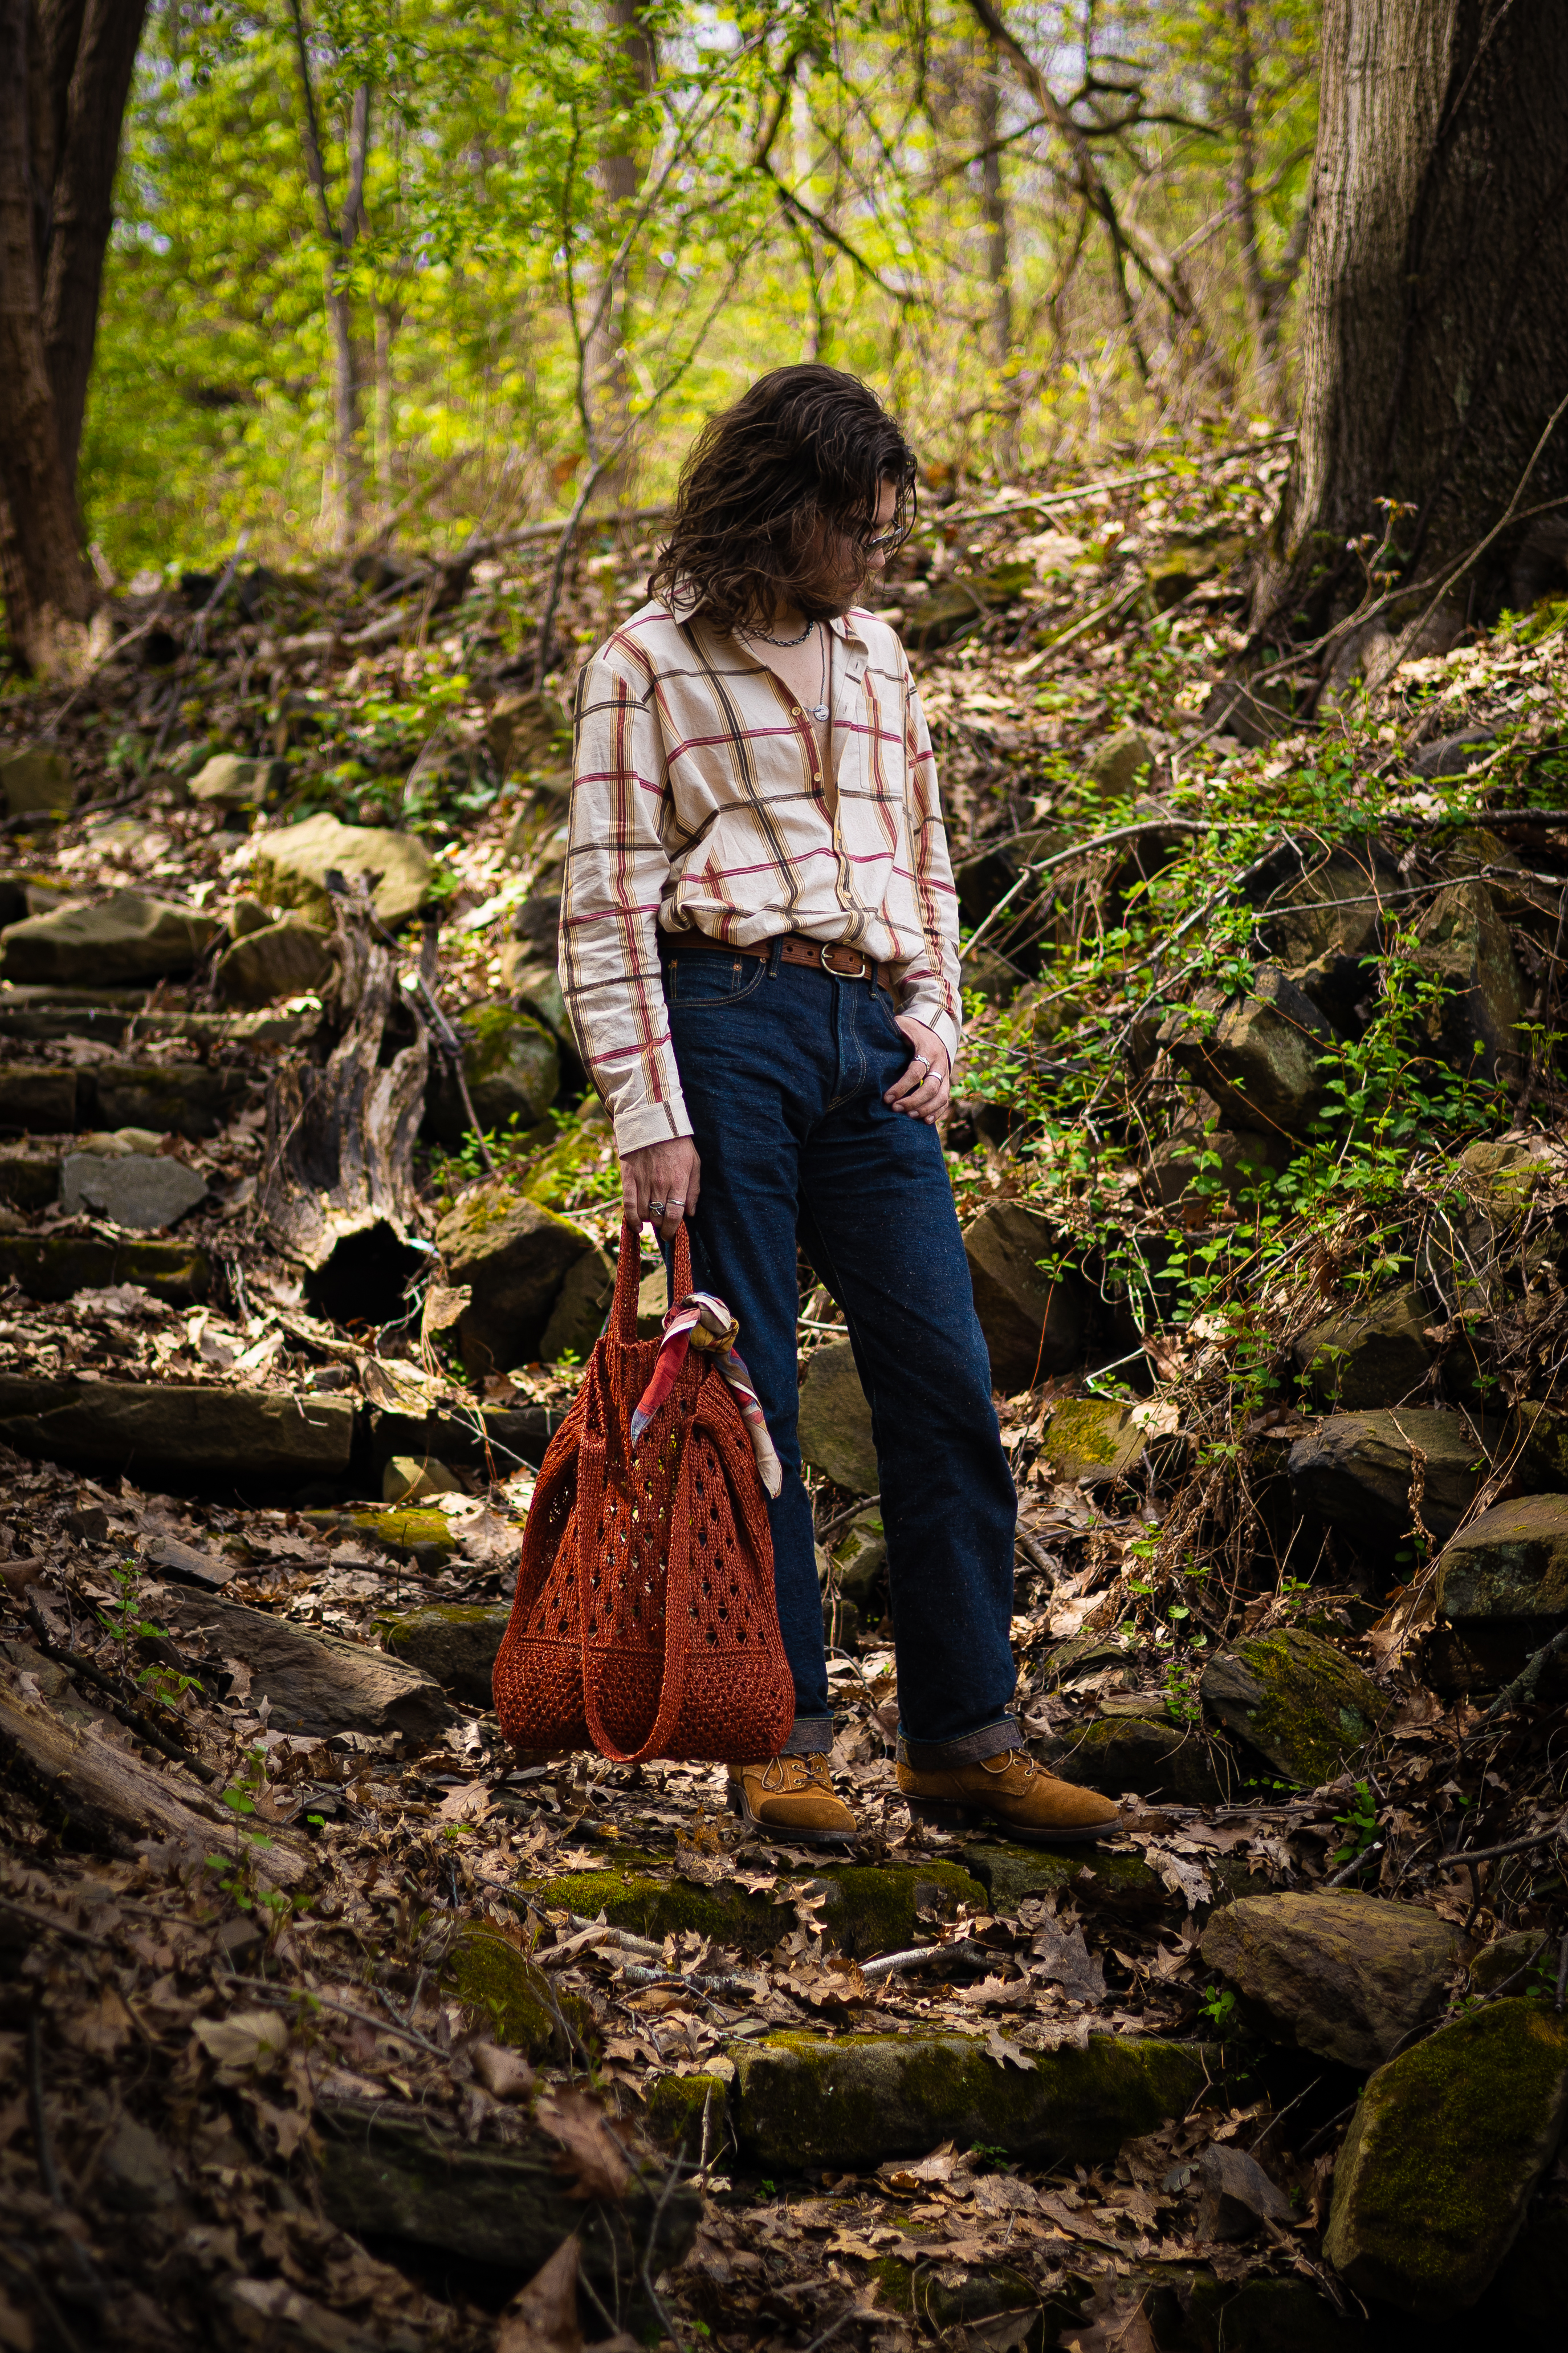
Regardless of whether you’re taking your photo on a $3000 dollar mirrorless camera or a $300 Android phone, you should be editing your photos. Most phone photo gallery apps will have solid editing features built in, or you can look into free apps such as Snapseed, or the mobile version of Lightroom has an alright free set of features. When editing photos, the easiest way to tell what a slider does is just to drag it left and right and see what it changes. Typically when I edit, I’m just fiddling with the knobs until I hit a level with one that makes me go “oooh yeah nice” and then move on to the next one. Play around with it! When you open your photos in the editing app, there’s a few dials I typically look for that can be really impactful for controlling how your photos look. Here’s some examples of each using one of my spring fit battle vote-in pics.
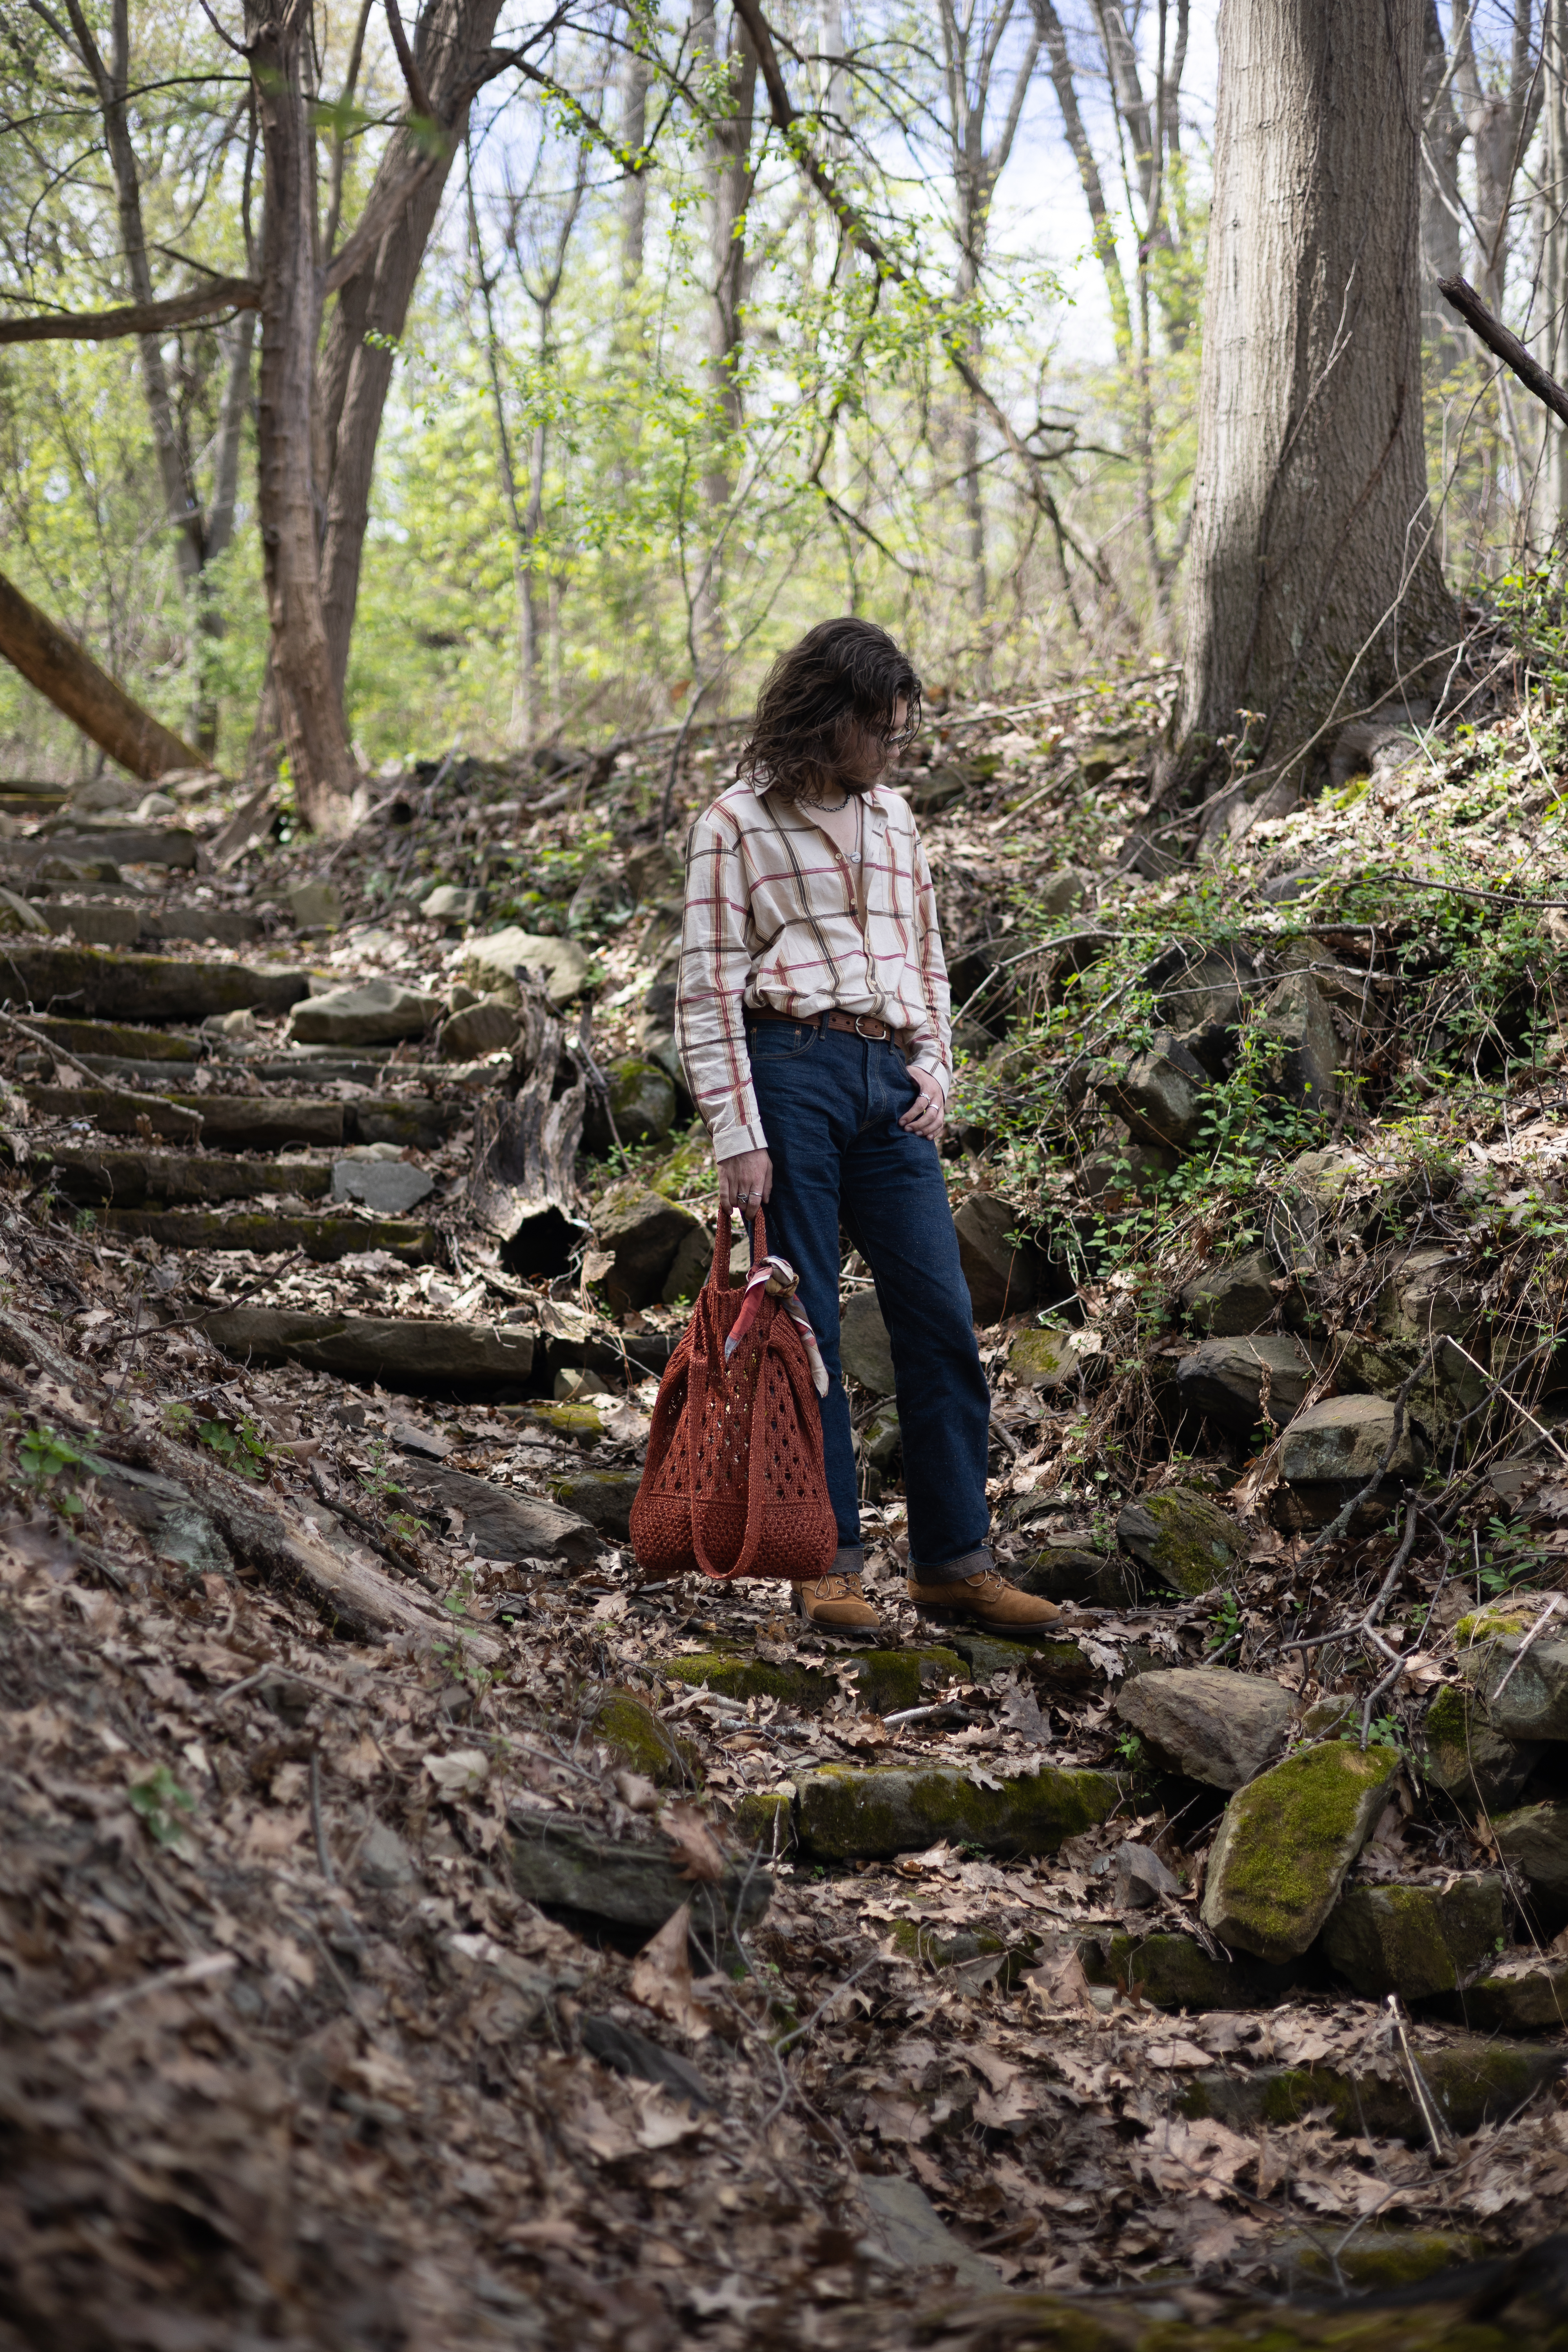

Crop: First up is to crop the image, which is just zooming in to the original picture to frame the contents (you, in this case) in a way that looks satisfying. This also includes rotation, because it’s pretty likely even if using a tripod that your camera is not the at the exact angle you want it at, whether that’s level or some other off angle. There’s of course a small reduction in quality the more you zoom, but even if you’re punching in 1.5x to 2x the better framing of the shot will likely be worth the tradeoff. In my pic’s case, I felt I was pretty small in the frame for this pic, and I was also off center, so I cropped in and to the side a bit until I was a good size in the frame and also centered to my eye.
Exposure: A slider that lets you make the entirety of an image brighter or darker. Note that it’s generally always better to dial this in while you are taking the picture itself, a well exposed picture will usually look better than a picture that has had its exposure modified in edit quite a bit.

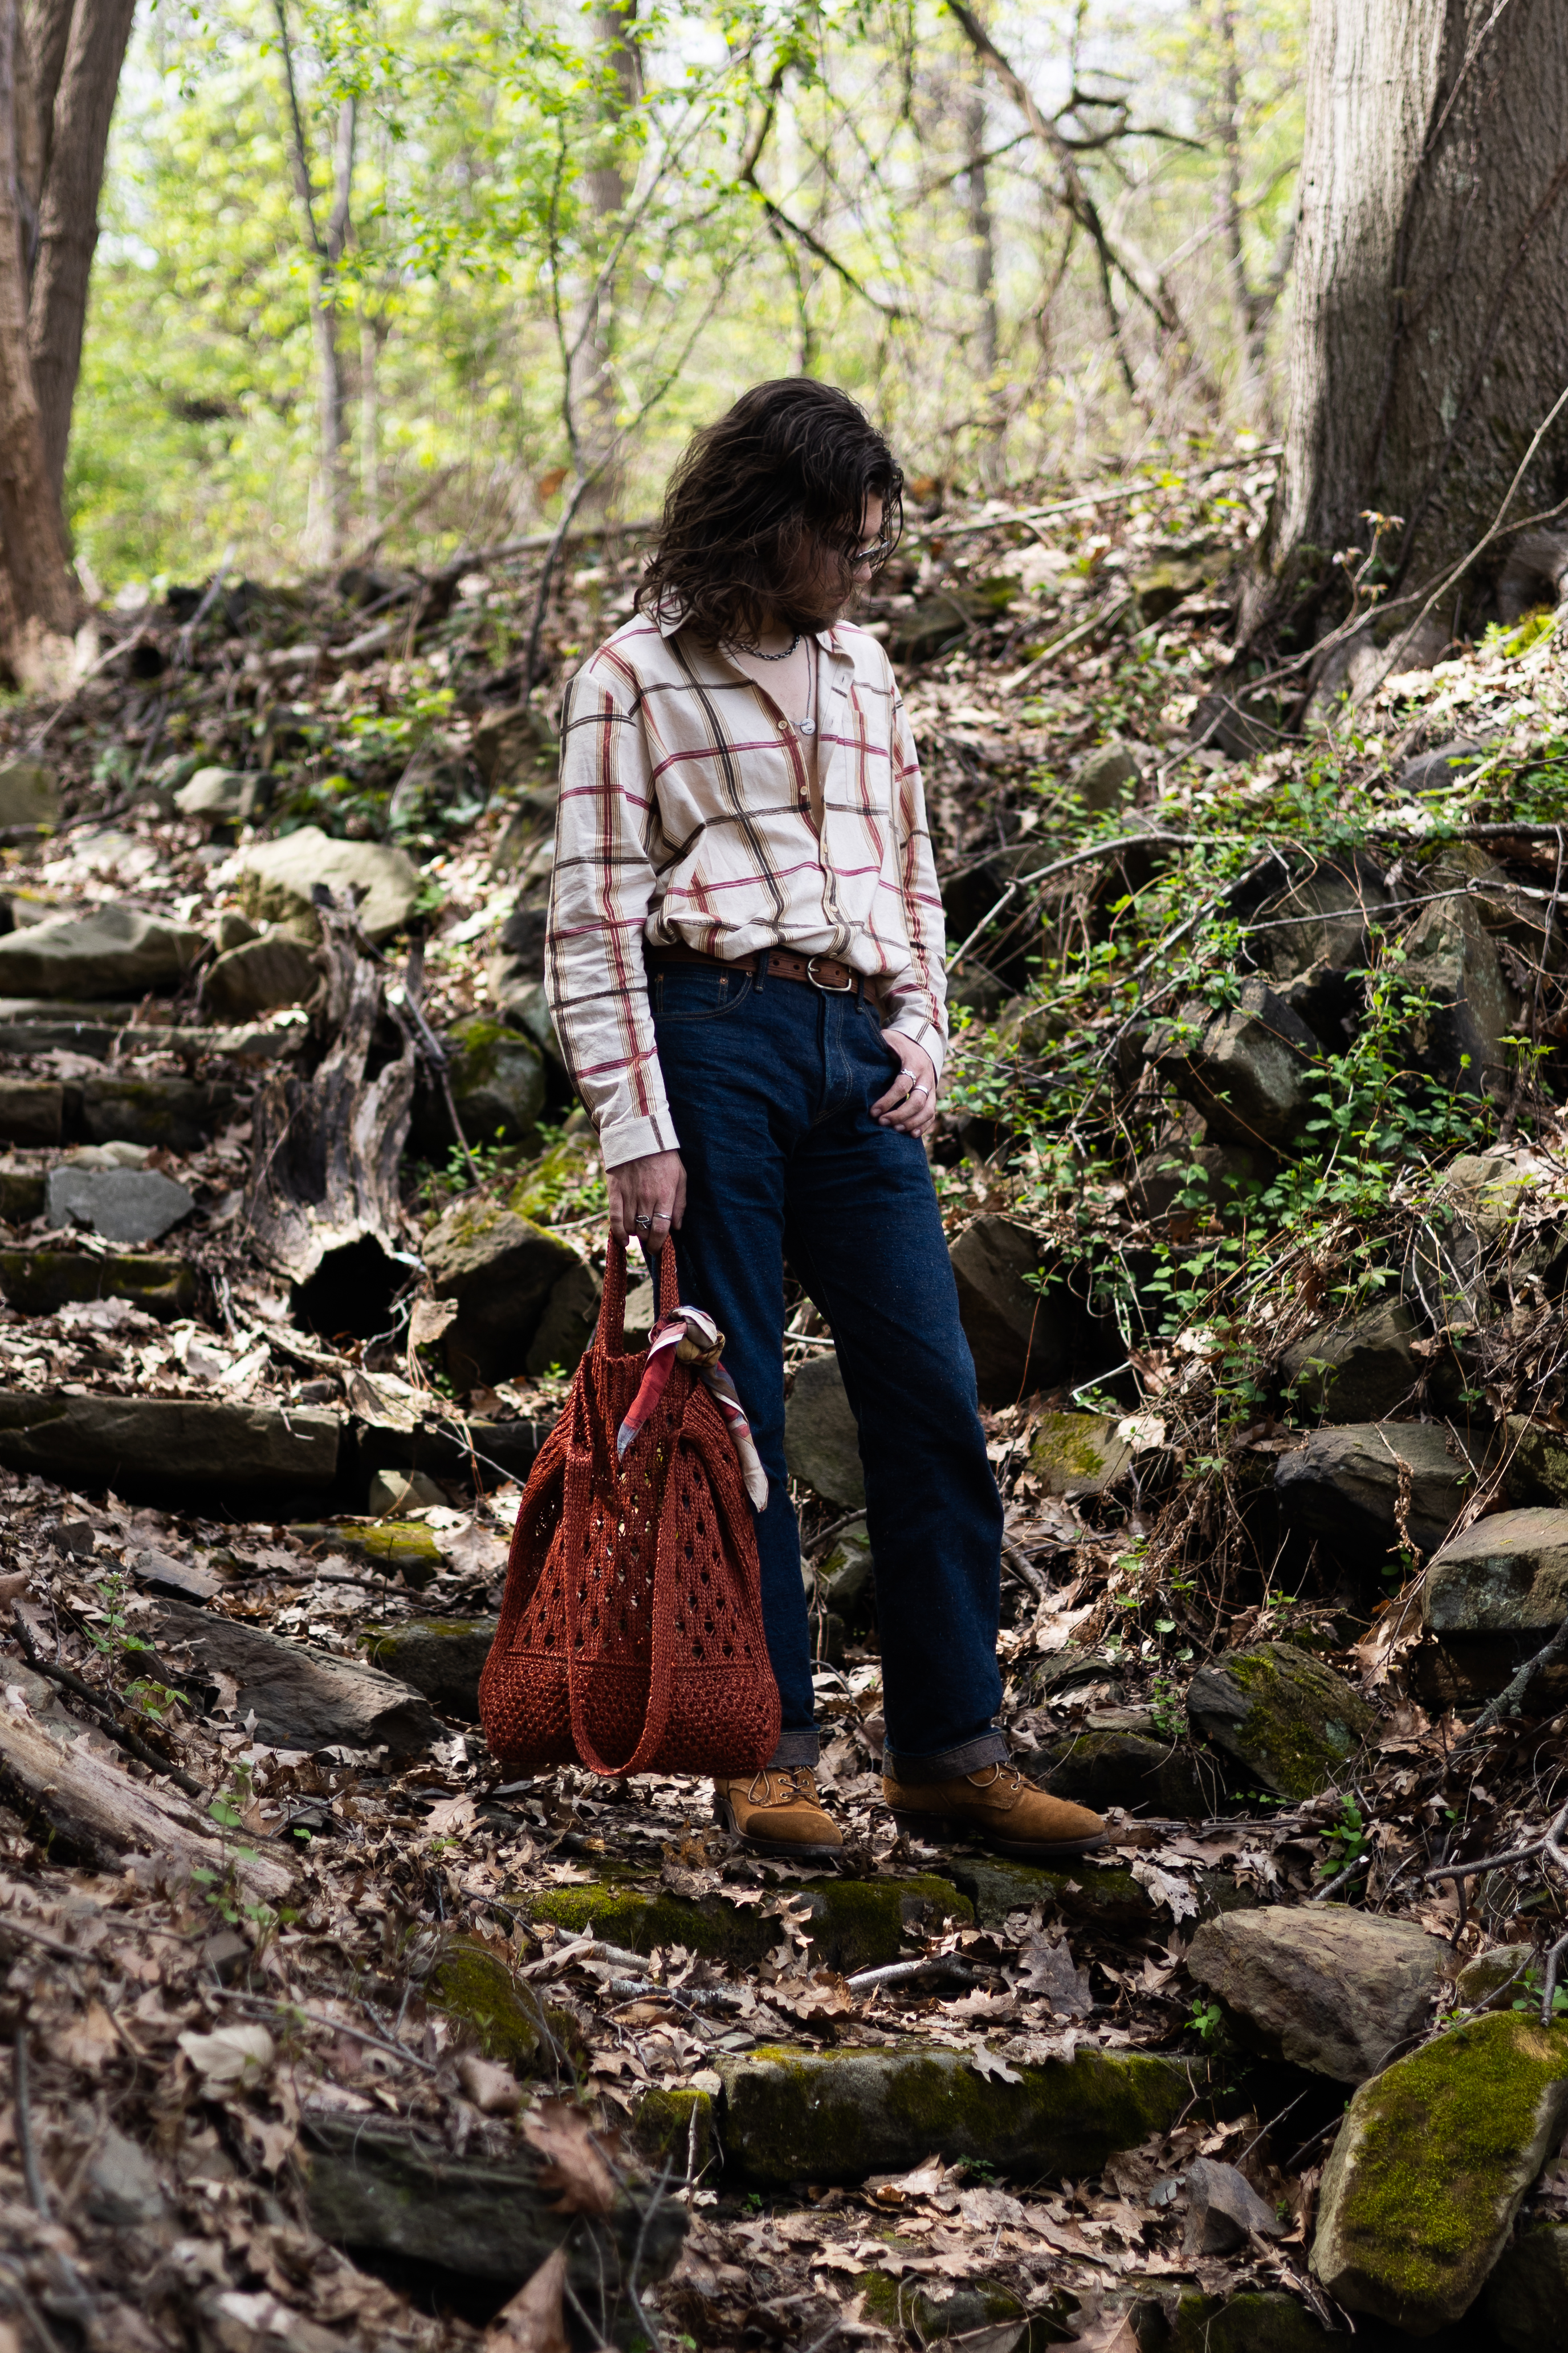
Contrast: more contrast makes the brighter parts of the image brighter while also making the darker parts darker. It can also give colors a bit more depth and separation, without affecting their saturation much.

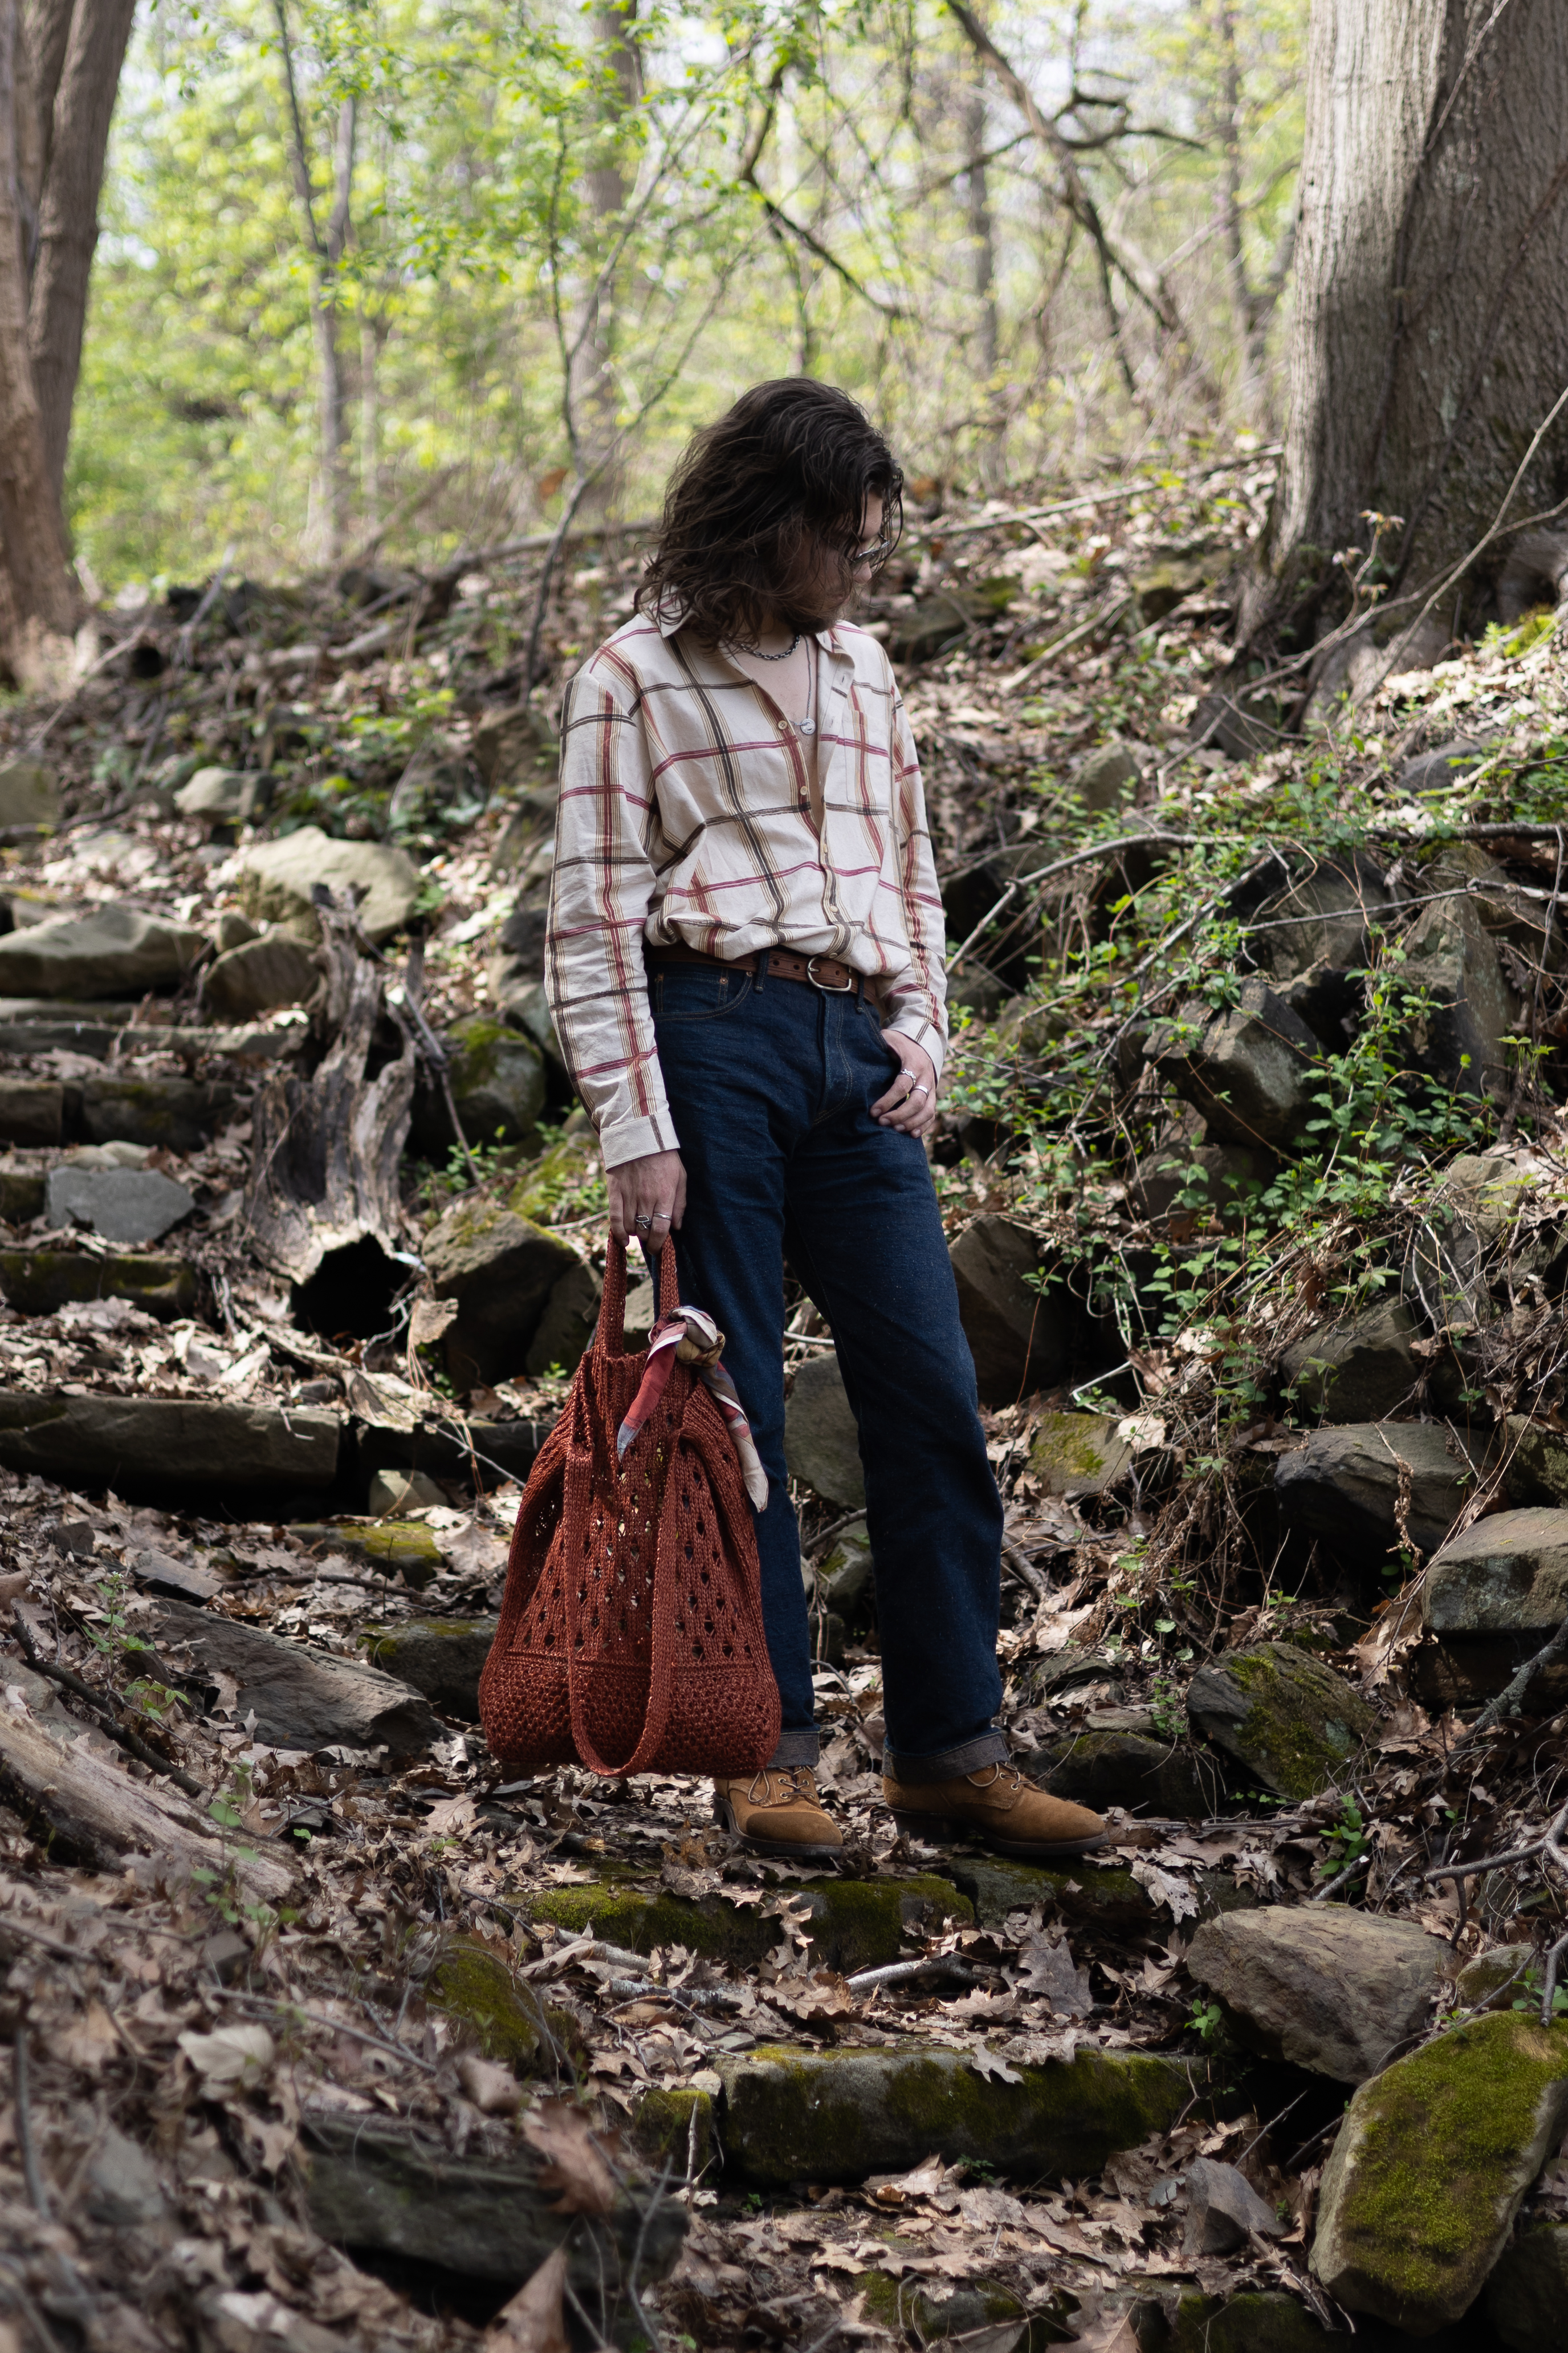

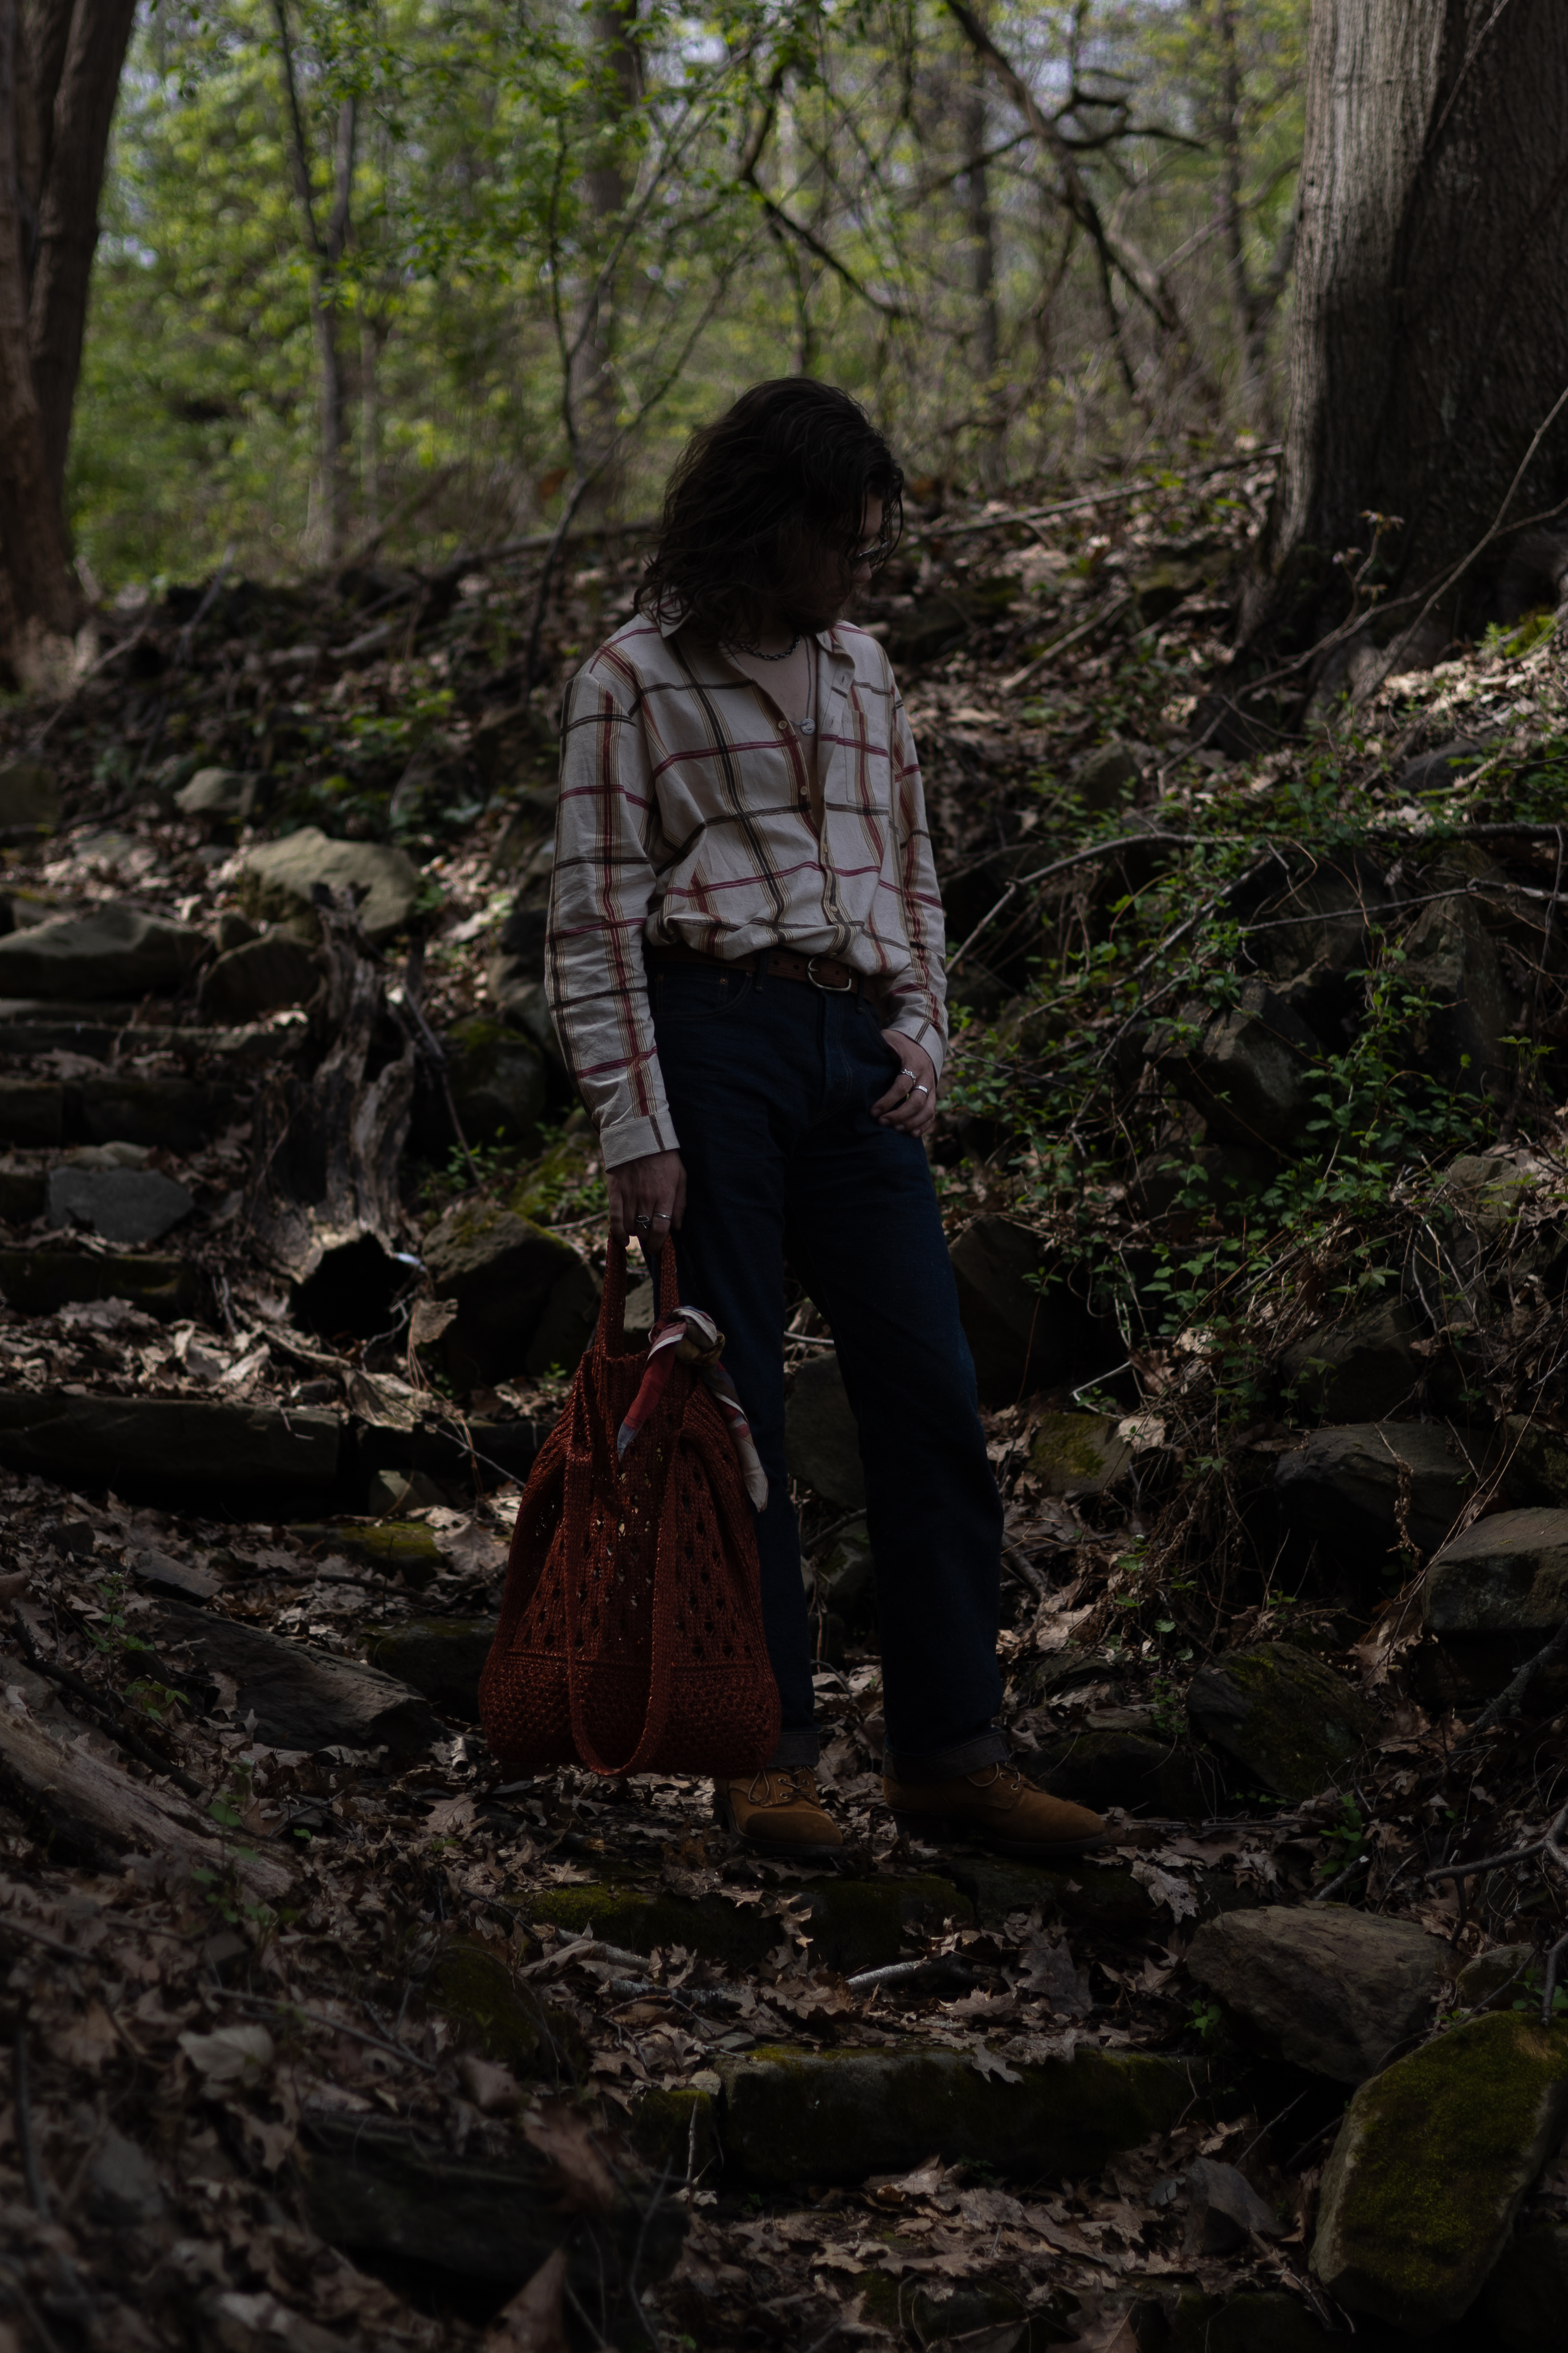
Highlights/Shadows: Like contrast but only for one half at a time. These can be useful if your white clothes are getting washed out and too bright to look at, or your black clothes are indiscernible amorphous blobs on your body. For the example image, highlights is most visible in the white of my shirt, and the shadows is most visible in the rocks at my feet or the side of my boot, or even my hair.
Texture/Sharpness: Somewhat similar settings that control how much detail you see in the small scale stuff of the photo. Particularly relevant for bringing out the details in fabrics. Mess with both to see what the differences are between the two, applying both is often good!
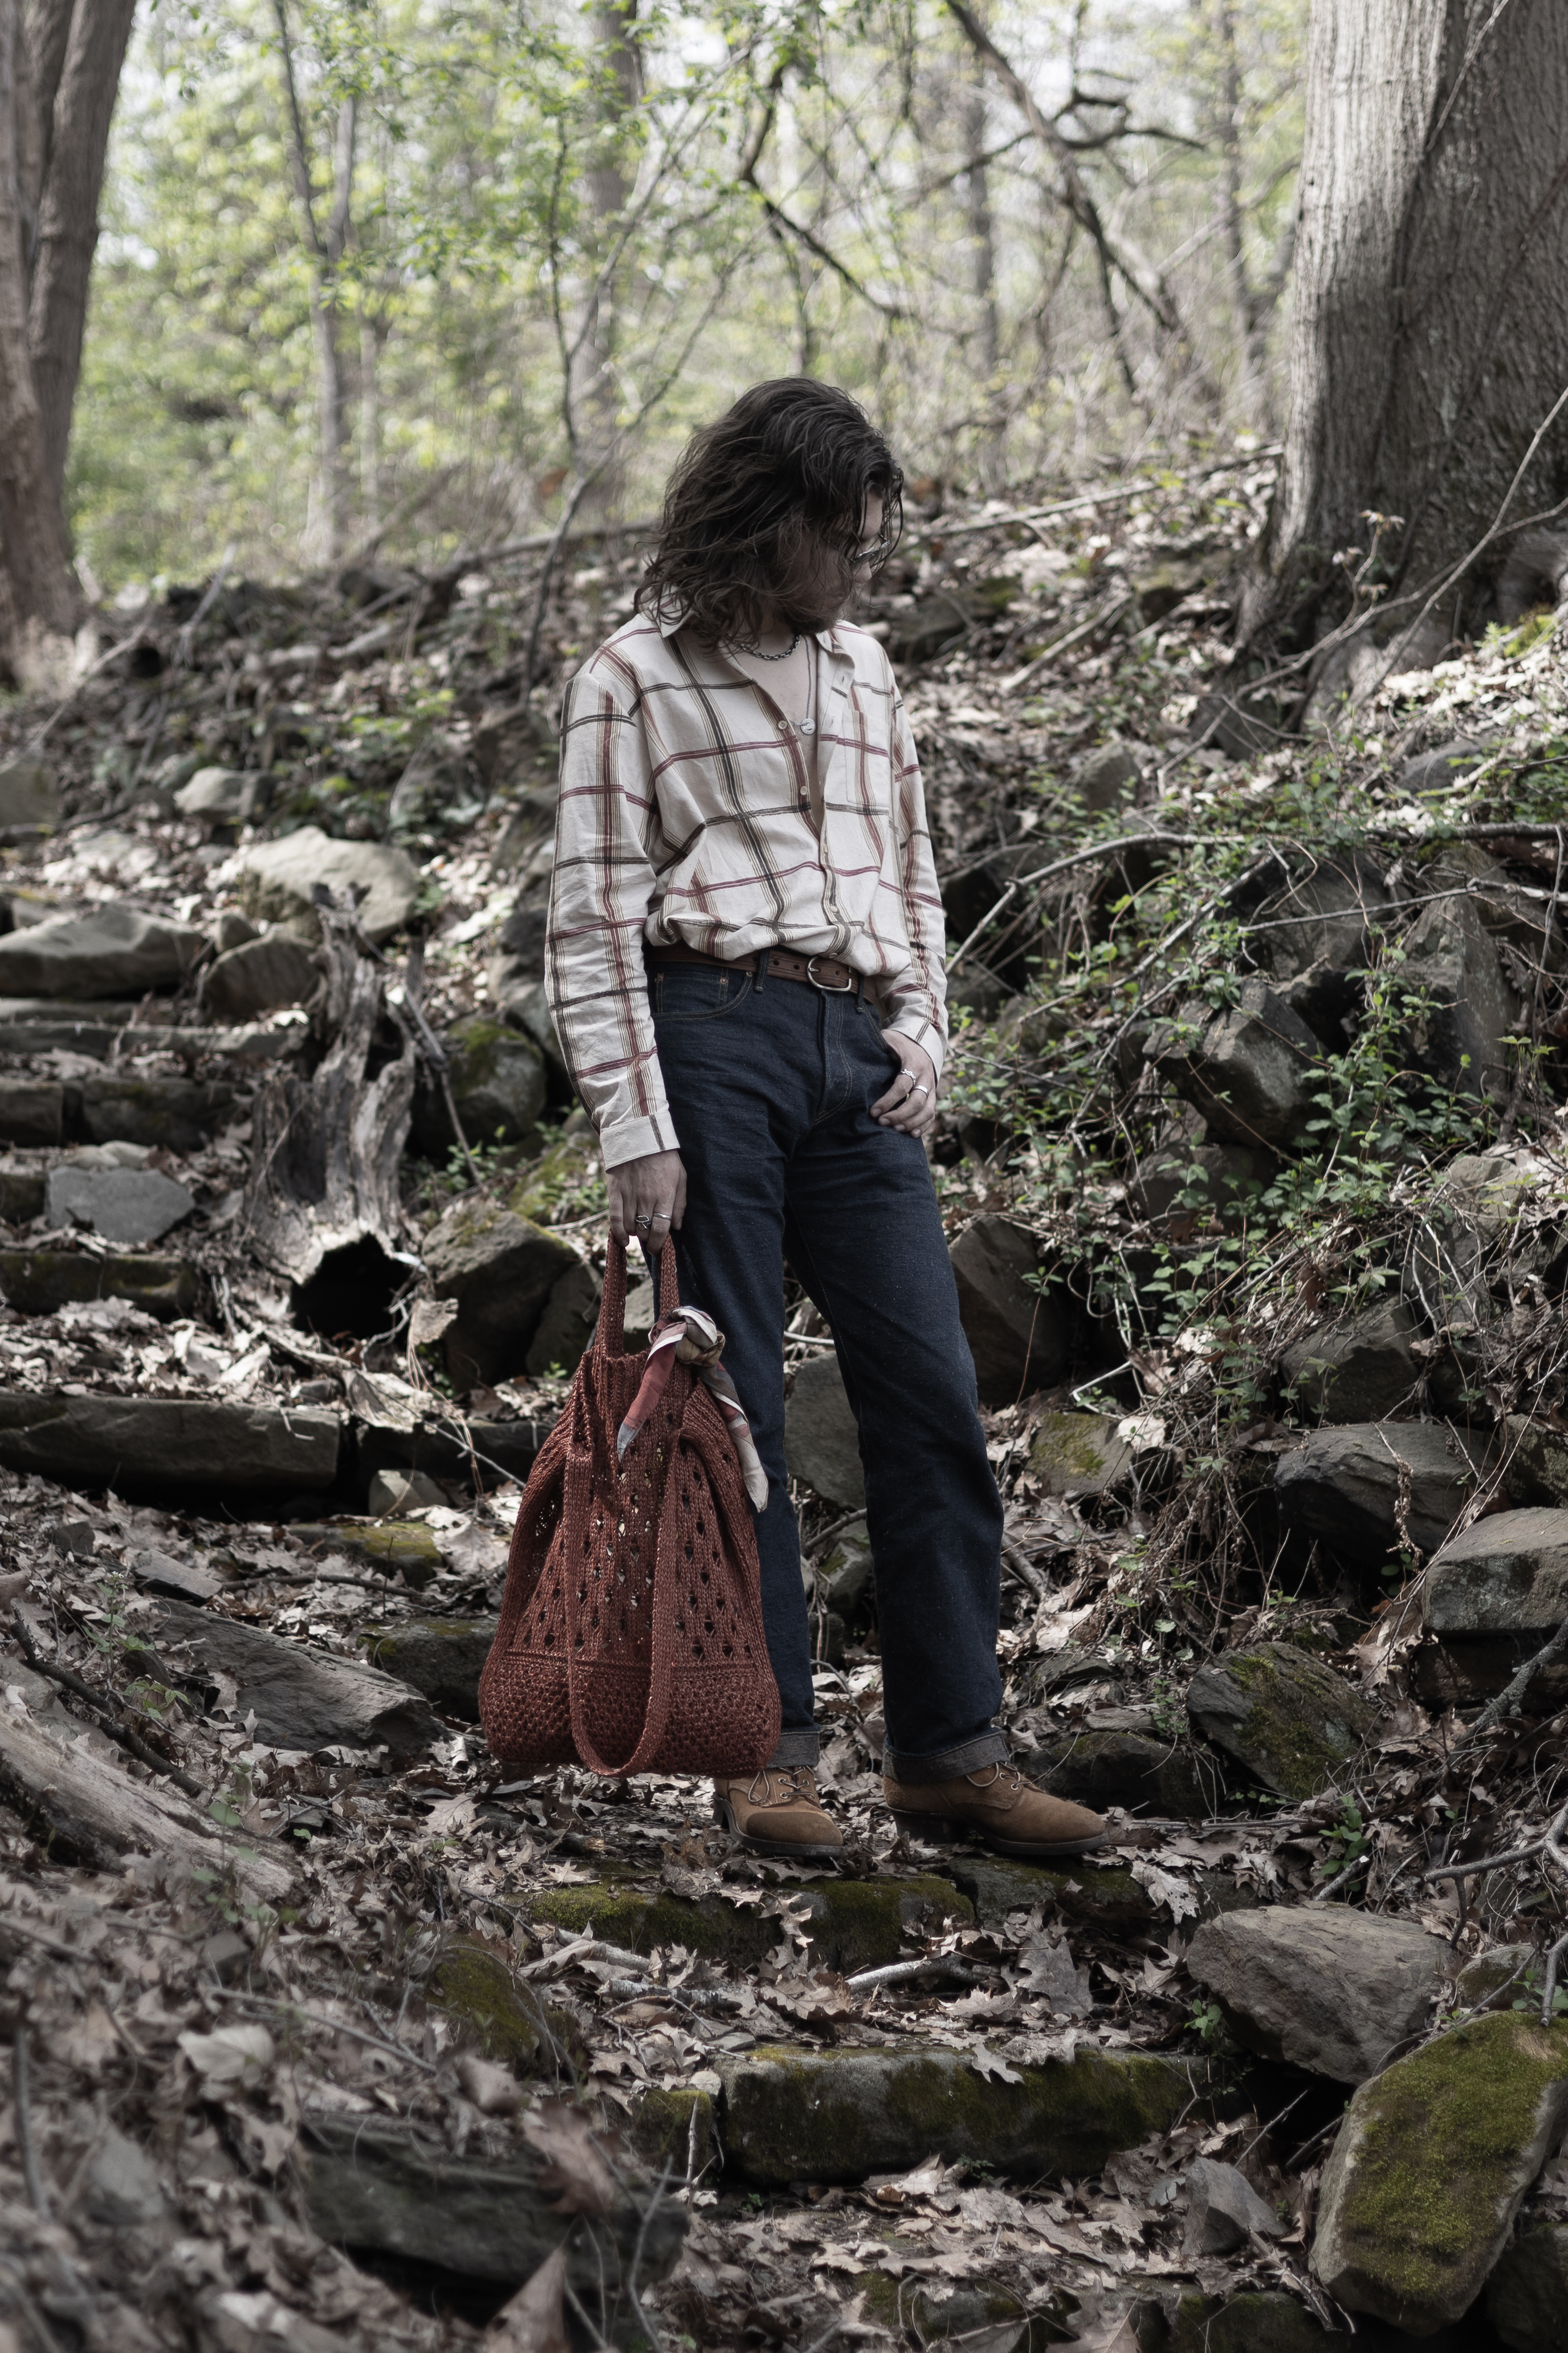

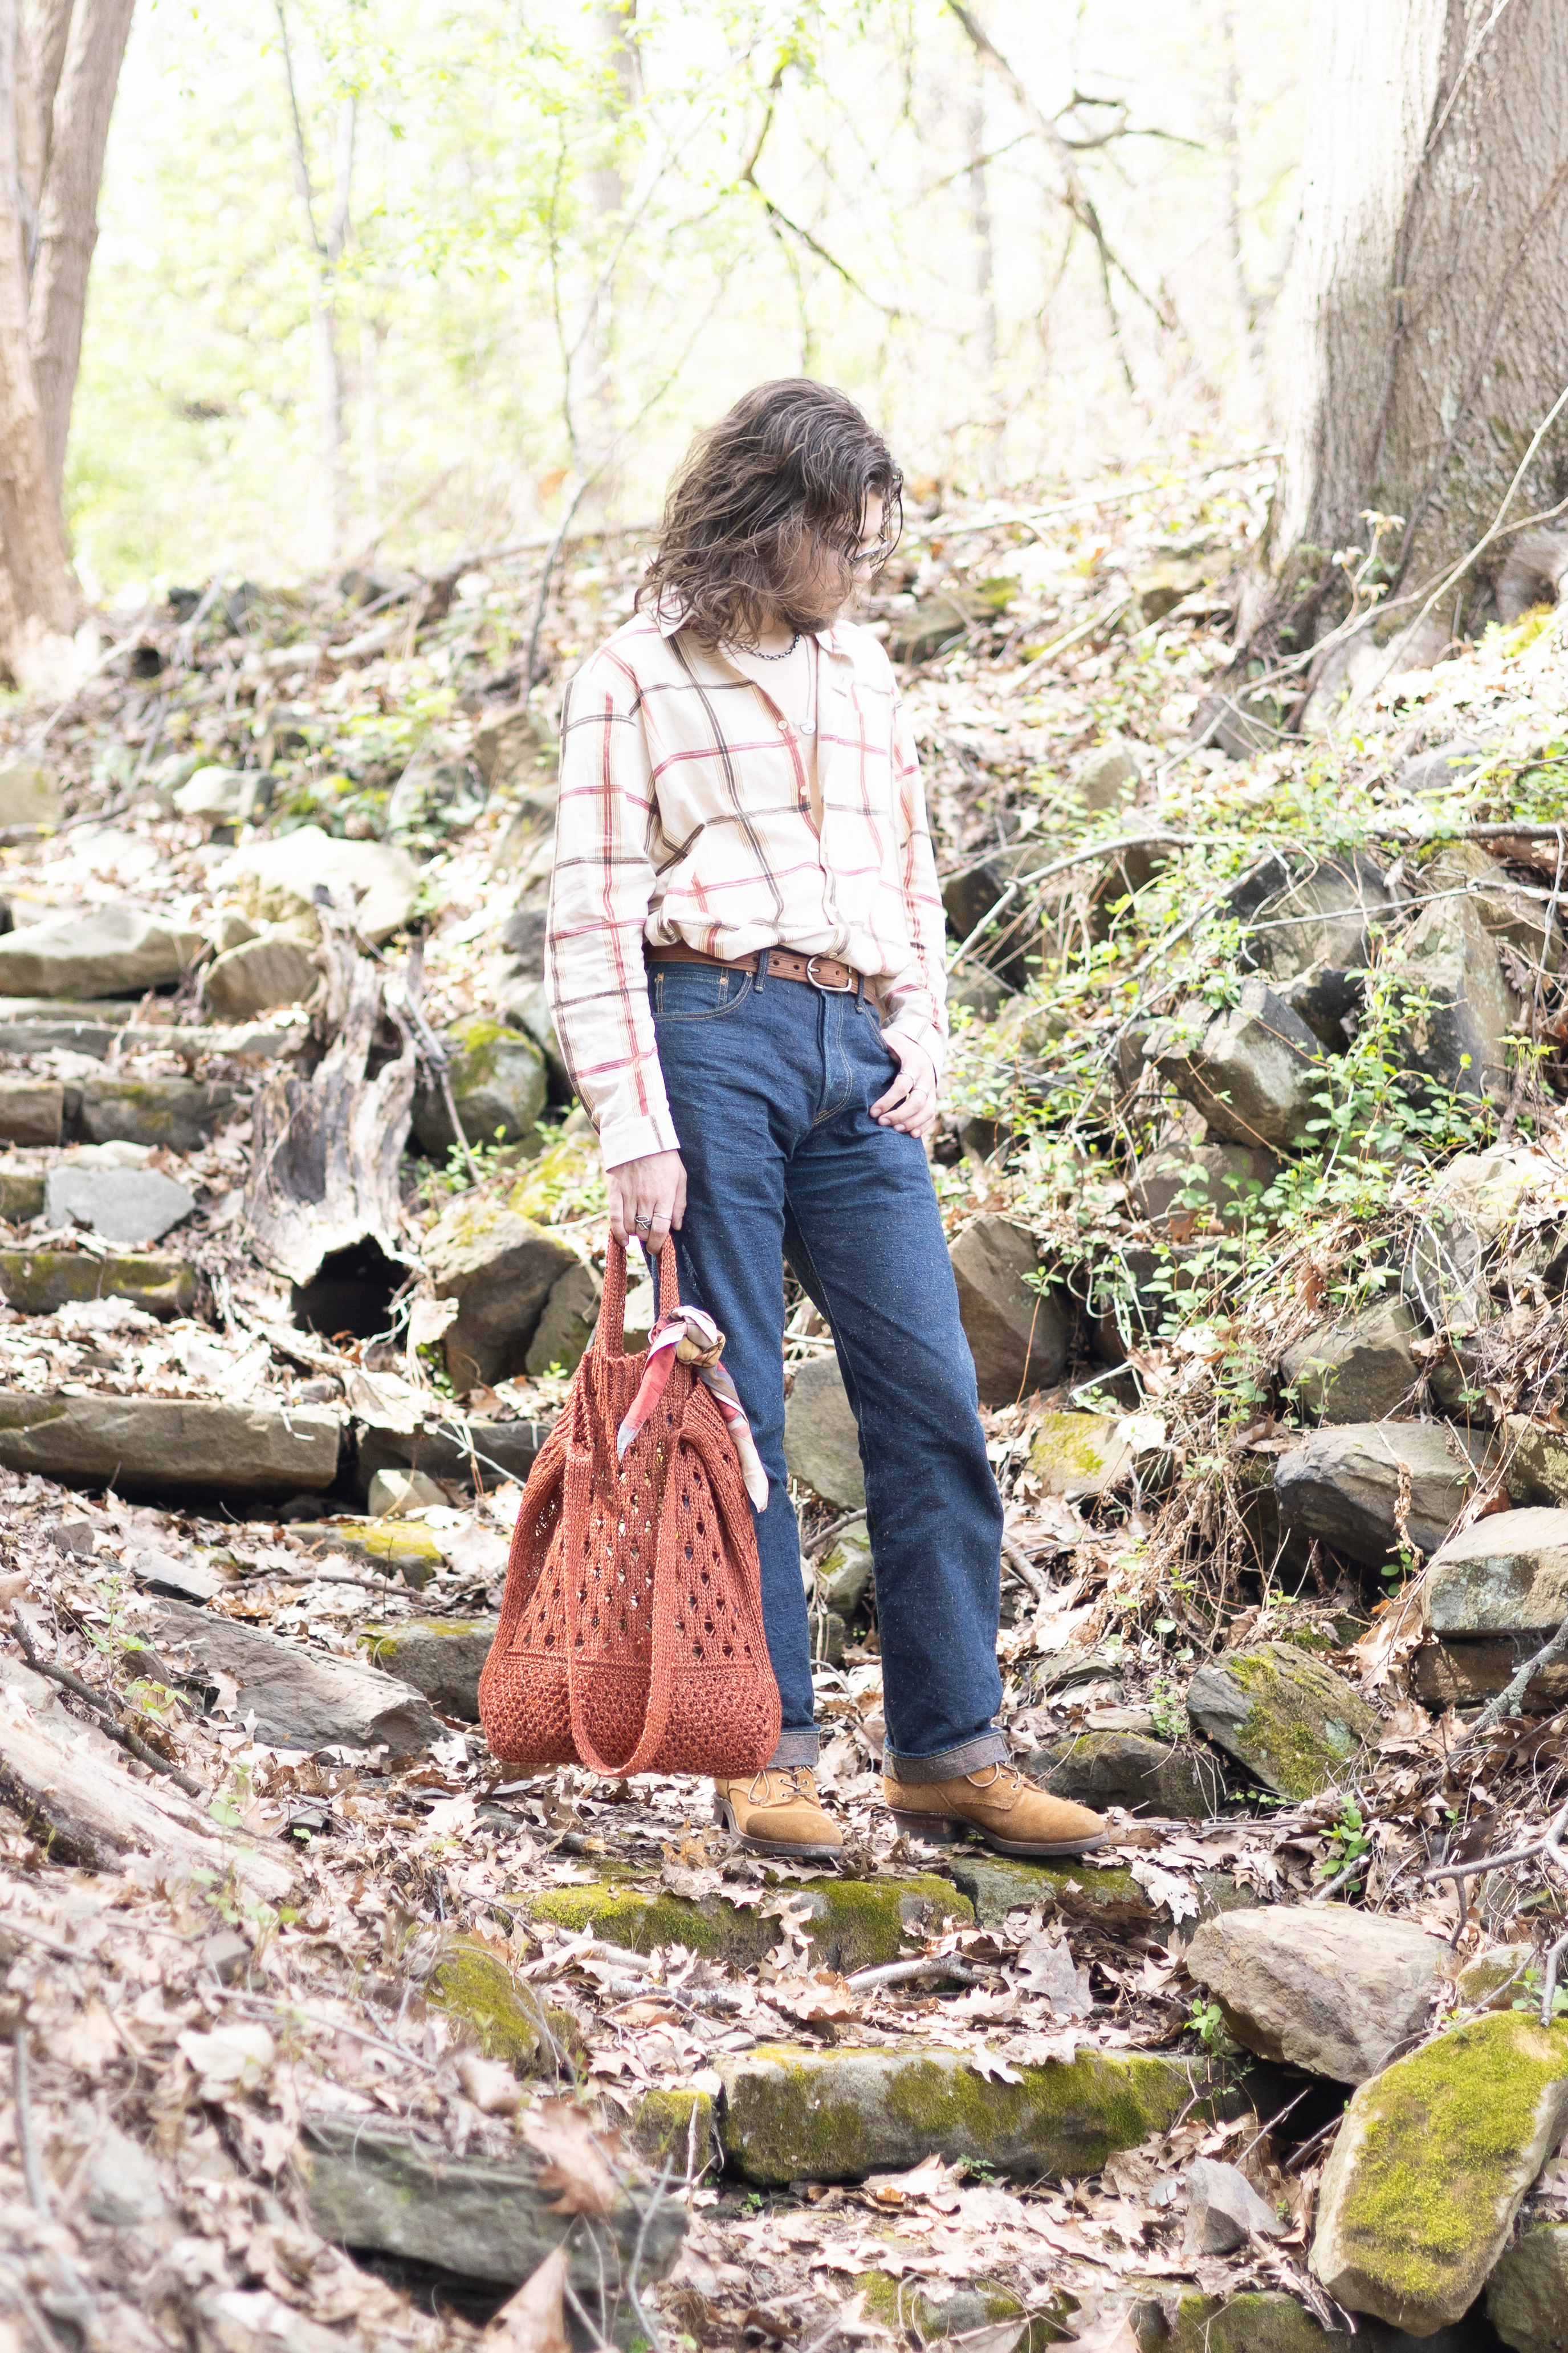
Saturation/Vibrance: These two dials can make your colors really pop. Vibrance takes a bit more tame of an approach than Saturation, which can sometimes brighten some colors to the point of looking unreal, but sometimes looking unreal is a good thing.


Color Temperature/Tint: The temperature controls how blue vs orange the picture looks. This is mostly concerned with the temperature of the illuminating light in your picture, and whether you want to modify the color temp of the pic to make it look like the light is pure white, or maybe to shift a more pure white light in the direction of something more colorful. Highly recommend messing with this knob in particular, try shifting this more orange and see how it looks, a nice slight orange tint can give a photo a kinda retro, mid-summer feel that can be quite nice. Tint is another dimension of a similar thing, but between green and magenta instead of blue and orange. I find that sometimes shifting things a touch towards magenta can make my skin look a bit more alive, but I definitely use this slider much less than Temperature.
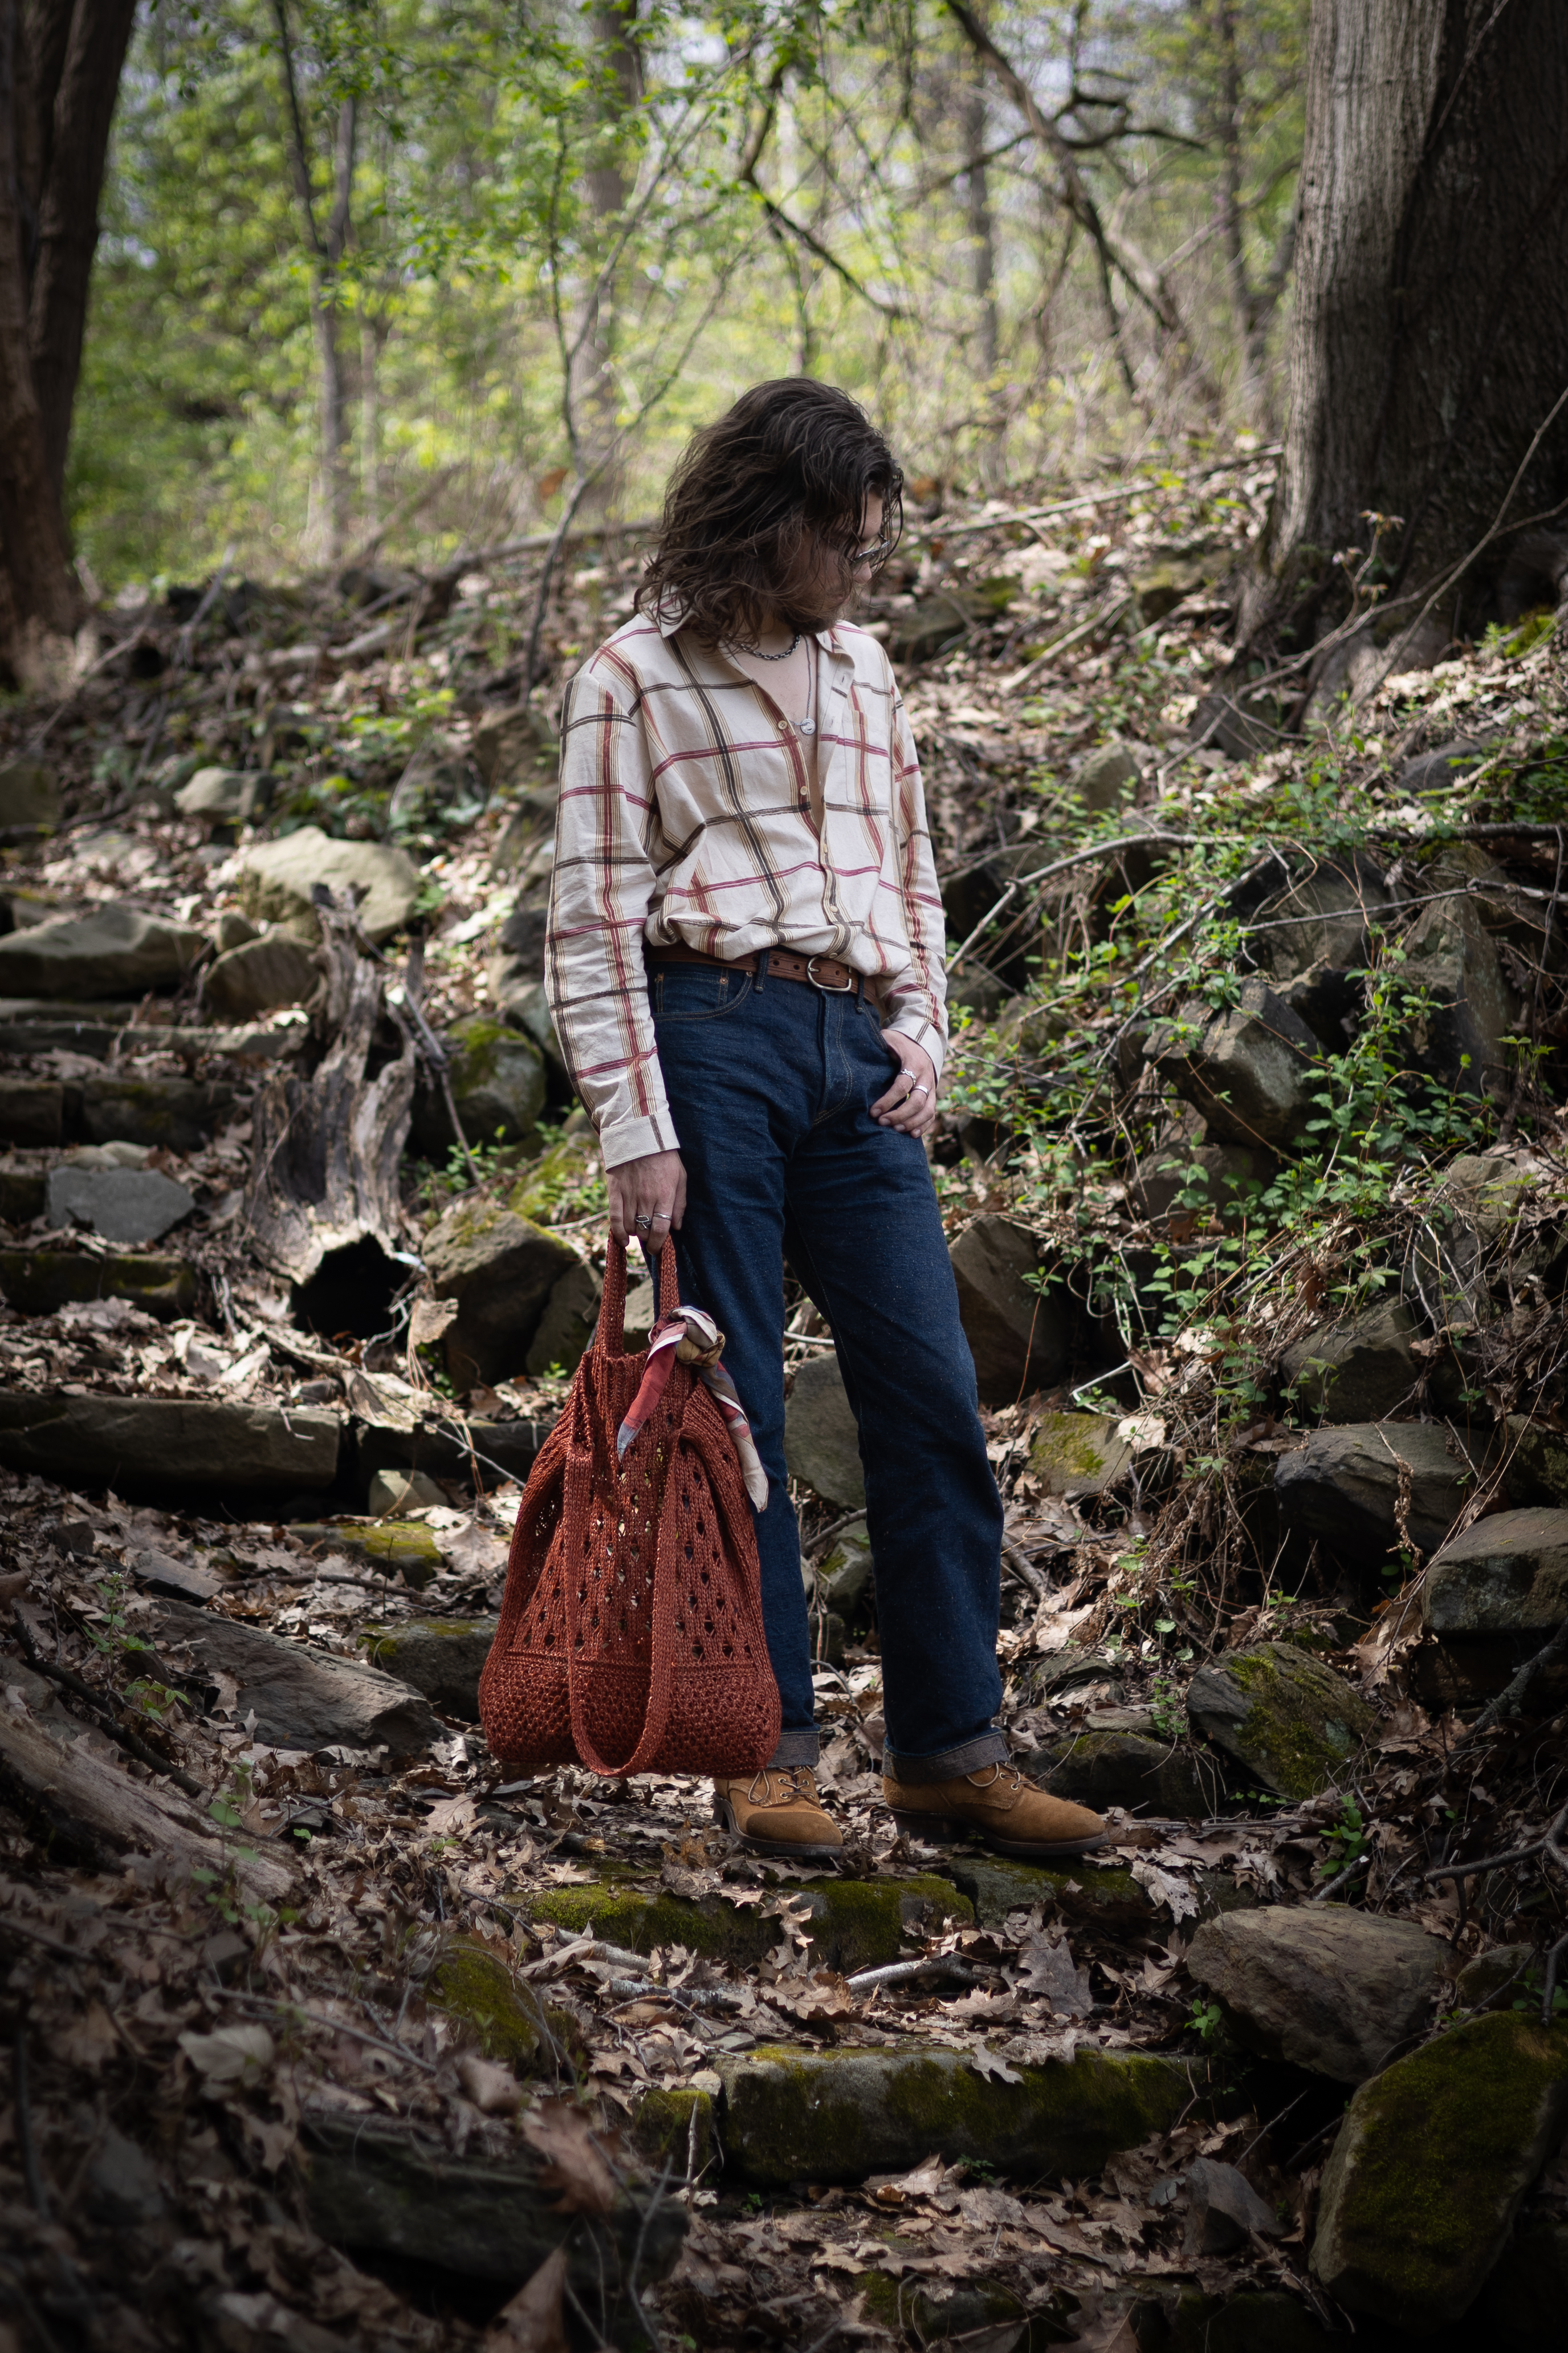
Vignette: More of an overlay effect than color processing, a Vignette is a fuzzy rounded overlay applied on top of a photo that darkens the sides and corners of a photo while leaving the center more untouched. This sort of mimics the look of some camera lenses that can have this effect naturally. It has the effect of drawing attention towards the center of the picture, which is typically where you will be standing.
Pulling It Together
There’s plenty more settings you can fiddle with, but those are the core that I almost always touch at least a little bit when editing any photo, including fit pics. I think it’s a good approach to go through the list of options and just make sure to touch each one, see how it changes the image, find a value that isn’t 0 or close to 0 that you like with it, and then move on. You can always return and dial things back later, although I’ll bet you end up liking it more than you anticipate.
For this photo, I gave it a slight bump to contrast (it had plenty just in the scene already), +75 vibrance, turned down specifically the blues in the color mixer so my jeans didn’t look so iridescent, +25 texture and +40 sharpness to give my clothes texture, added a vignette to deemphasize my surroundings in the pic, and upped the color temperature to give it a bit of an orange tint to make it “feel like summer”, and voilà an edited fit battle fit pic.
I just have this dumbass phone how do I make it take good photos
Phone cameras haven’t been getting the best PR lately, and not for no reason. Typically they are tuned to take the least offensive possible version of the photo. HDR processing means that the darkest parts of the image are not much darker than the brightest parts, even when the shot is of a scene with pretty intense variation in brightness, like the sky right next to a dark shadow. They can be more like clinical records than photos. The criticisms are not unfounded, but I find they can be a bit exaggerated. Phone cameras can take plenty good enough photos, even mid-range or budget phones. Here’s a few things to do to try and get the best photo possible out of your camera:
RAW Files
If you have a phone that supports it (most flagship android phones, any “Pro” iPhones), turn on RAW support in the camera app. RAW files are larger photo files, more like a dump of raw sensor data than an image. This extra information can make them a bit better to edit, it gives the editor apps more context and information to work with to make the highest quality changes to the photo. Not just that though, RAW files are typically saved earlier in the processing pipeline than the JPG is, so some of the contrast-killing, texture-smoothing qualities that phone cameras tend to have can be a bit reduced in RAW files. If your phone doesn’t support saving RAW files by default, you might be able to find an app in your App Store that enables it, on iOS there is Halide (paid) and Project Indigo (free), and there’s definitely more.
Zoom With Your Feet
Phone camera apps love to show you lots of zoom levels options, with a nice little slider to zoom in just the right amount to fit you and your outfit nicely in the frame. These are, however, a trap. They’re zooming in digitally which has little to no difference vs just applying a heavy crop in an editor, which you can do your own dang self anyway. Digital zoom will always reduce the quality of your image, so instead of having the phone zoom in to fit you in frame, reposition the phone to fit you in frame. If your phone is positioned such that, without any zoom (that doesn’t come from an extra telephoto lens) you fit nicely in frame, your photo will come out much better. This doesn’t necessarily mean that you should fit exactly right in the frame of your photo, having a bit of distance between you and your phone can make the angle of the shot look better than if you’re standing very close to it. Take a few test photos at various distances and see how each amount of zoom looks, keeping in mind that the less zoom you have to use the higher quality the photo will be. If your phone has a built in zoom lens that isn’t insanely high, give that a try, it might let you get a flatter image with the zoom without having to sacrifice image quality.
Edit Your Phone Photos
Go back to the previous section and actually do it. Phone photos come out looking bland and uninteresting because phone makers expect people to then use filters to make them look interesting and artful. It needs to look normal first so people can put their spin on it after instead. If you edit your photos they will look a million times better.
Help I have this digital camera I bought when it was a TikTok trend and there’s 7 knobs and idk what any of them do
Most dedicated cameras will take better photos at a baseline than a phone camera can, just due to the size of the sensor alone, so it’s worth figuring out how to use the thing to try taking your pictures with it. The number one tip here is to look up the manual or YouTube guides for your specific model of camera, how to use a cameras varies pretty significantly even within brands depending on the camera model. Here’s some more general things to be aware of though that are pretty universal.
Most of the core camera settings you need to be aware of involve making sure that the camera is exposed correctly for the shot, e.g. for a fit pic that you can see yourself clearly enough (or enough that you can make it clear in the edit). There are 3 different settings that a camera has to dial this in: aperture, shutter speed, and ISO. Each of these settings not only affects how bright or dark the image is, but has a secondary effect that is worth considering.
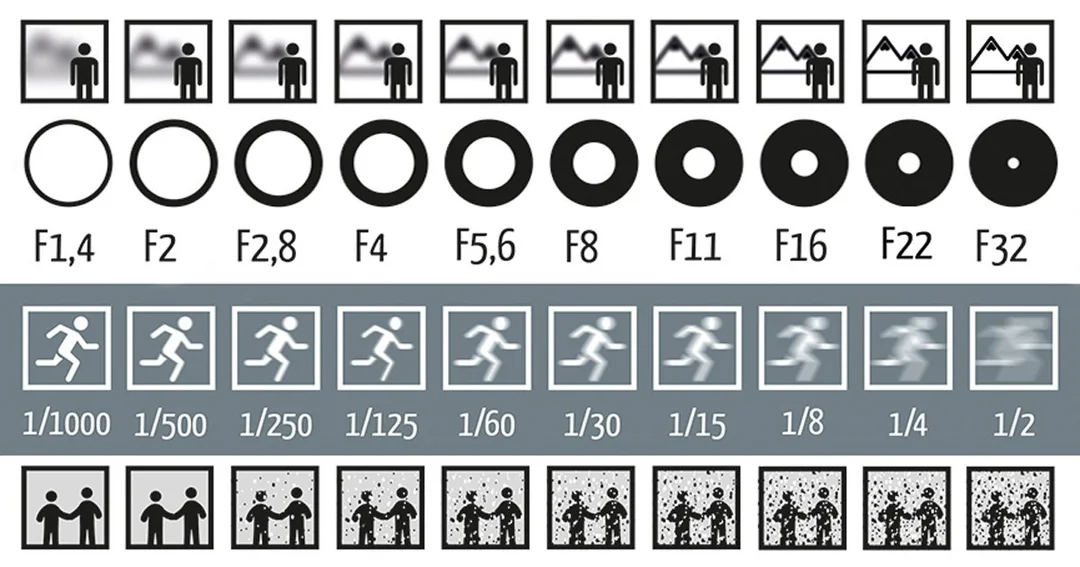
Aperture
IMO the most important control to be aware of for fit pics. The aperture is the size of the hole that the light passes through on the way to the camera, and your camera can control the size of that hole. The bigger the hole, the more light comes through, the brighter the image is. However, due to physics, making the hole bigger also has the effect of making anything closer or further away than the point where the camera is focused blurrier. This, for fit pics, is often really cool. When I take fit pics I typically want as much of that blur (called depth-of-field) as I can, it looks really nice, so I’ll usually put my camera in some kind of “aperture lock” mode and force it to be as open as it can be. Note that aperture is measured as the denominator of a fraction, so a bigger number counterintuitively means the hole is smaller, bringing in less light, and causing less blur. This means I typically shoot with as “small” of an aperture value as I can, to open the hole up wide and get lots of light and lots of blur.
Shutter Speed
Probably the most intuitive of the three, shutter speed simply controls how long the shutter is held open when taking the shot. The longer it’s open, the more light is gathered, the brighter the image is. However, the entire time the shutter is open, the sensor is gathering light. This means if the camera moves at all while the shutter is open, or if a thing in frame moves while the shutter is open, that movement will blur in the final photo. This is called motion blur. Typically, when I take fit pics, I want this shutter speed to be reasonably low, so that as I move around trying to find good poses not all of my photos come out as blurry arms/body movement. That being said, you might have an idea for a pic where you are in motion and you want that highlighted with lots of motion blur. In that case, you might want to make this value higher, but make sure if you do this that you have a stable place to put the camera so that it doesn’t move while the shot is being taken.
ISO
The most straightforward of the three, ISO is essentially a value that bumps the readout of the sensor to make the image brighter. The trade off here, is that digital camera sensors are actually pretty noisy, and when the ISO gets high you can start to see it. Common consideration here is to dial in the other two settings the way they are needed to get the depth-of-field and motion blur you want for your shot, and then use ISO to get the rest of the way to a well exposed picture, remembering that if you can modify one of the other values to take in more light you can lower ISO and thus remove some of the grainy noise that ISO brings.
Shooting the Camera
Typically on a camera you have mode options that allow you to lock one of either aperture or shutter speed at a specific value, and then will adjust the other and ISO to meet the exposure needs of the photo the camera is taking. These modes are often found on some knob on the top of the camera. Since I specifically want my photos to have as much depth-of-field blur as possible, I put my camera in aperture priority mode (might be labeled Av or A, might not). Once I find that mode and make the aperture as wide as I can, and make sure the shutter speed isn’t going to go so high that I’ll be super blurry in motion (less than 1/50s is a good number to shoot for), then I look for an interval shooting mode or something similar.
There’s typically multiple ways to actually take the photo, depending on your model of camera. You can go out and buy cheap camera remotes that you can connect to the camera and allow you to just press a button to take the photo. You can also look for that interval shooting mode, which will take a photo every x amount of seconds. Both of these options let you setup the camera, on a tripod if you have one or a convenient flat surface if you don’t, and then walk in frame and take the shots all completely by yourself.
The alternative, of course, is to ask your friends or loved ones for help. Assuming you’ve already set the camera settings for them for the shot you want, all they need to know is where to point the camera and where to stand to get the shot you have in mind, and then to press the shutter button half way down to make sure it’s focused on you correctly when you’re in the right spot, and then press it the rest of the way down to take the pic. My number one advice here, take as many pictures as you can. Taking pictures of people is always a game of finding the 1 out of a 100 shot where everything is perfect, your hand is in the right spot and the clothes are sitting in a good way and your face isn’t doing a weird thing and the lighting is just right. The more shots you take, the more likely all the stars align for some of them.
Conclusion
Find cool things to stand in front of, take the pic in good even but bright lighting, turn on RAW mode, and edit your photos.